Sunday, July 31, 2011

Chicken Parmesan “To Go” [Zack]

I have always loved chicken parmesan ever since I can remember.  To my young palate, a good chicken parmesan defined the quality of the Italian restaurant.  Since I couldn’t get enough of it, we always begged my Mom to make it for us if we hadn’t had our fix for a while.  Hers was always better than the restaurants anyways… 

This dish is a great introduction to learn how to cook a simple Italian meal because it teaches you a few cooking techniques.  You will learn how to cook a chicken breast that won’t be dry and sad, whip up a very simple and clean tomato sauce, and have a meal that you can heat up in the oven when you are too busy to cook during the week. 

This recipe is dubbed “To Go” because one of our friends had eye surgery and we decided to make her dinner while she was cooped up in her house recovering.  We wanted to make sure that she didn’t have to do anything but pop 2 containers into an oven, and then eat it when the timer goes off.  As a working parent, or if you are just a busy dude, this recipe is great for when you need a meal in a flash.  You can freeze this in batches - when you want it for dinner, put it in the fridge the night before you want to eat it.  Come home, heat it up and dinner is served! 


Process:

First, start your fast tomato sauce by adding ¼ cup of olive oil in the bottom of a cold pot with the smashed garlic cloves and basil leaves. 


Bring this up to medium heat.  Once it starts sizzling and before your garlic starts browning, add in your tomato puree and the diced fresh tomatoes and turn down the heat to low.  Let this simmer for 30 minutes or so until you have finished making your chicken.


Place breadcrumbs onto a plate and beat 2 eggs in a bowl.  Season the breadcrumbs with a bit of salt and pepper and some herbs if desired (if not using store-bought).  Place the chicken breasts on a cutting board and cover the first one with plastic wrap (so chicken doesn’t go flying around your kitchen).  Use a heavy blunt object and pound out the breast to an even 1/2 inch thickness.  Don’t try to smash it - use medium force. 


Why pound out chicken breasts you say?
·         It will make the breast tender by breaking up the fibers
·         It’s fun and it sounds like you are cooking your ass off
·         It is way easier to cook (even thickness = no dry thin edges)
·         If you had you had a bad day at work


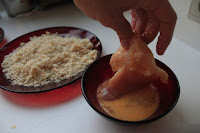
Dip the chicken breasts into the egg, let it drip off a bit, then roll it in the breadcrumbs until it is covered. 


Heat a pan to medium heat with a good coating of oil on the bottom and add the chicken breasts when it has come up to temperature.  Lightly fry the chicken breasts until golden on both sides.  Don’t worry about under cooking it slightly because it will finish in the oven.


Your red sauce should look beautiful now.  Lightly cover the bottom of your baking dish with the sauce, then add in the chicken pieces Tetris-style.  Another light layer of the red sauce, then go as crazy as you want with the cheese.   I like putting the motz down first, then the romano because it browns nicely then!


Either toss the whole shebang uncovered into the oven right then at 400F / 200C or wait until it cools off and then cover and freeze.  If properly thawed, it should cook in about 20-30 minutes with a nicely-browned cheese on top!

Optional:

Before you start your tomato sauce, cut up some vegetables (I like eggplants, squash, red peppers, and shallots) and toss in olive oil, salt, pepper, and a few T of balsamic vinegar.  Put these in the oven while it is pre-heating and they finish right around the same time your chicken is ready.  You can also freeze these and re-heat them the same time as the chicken parm.


Recipe (can be doubled or tripled for multiple batches for your freezer):
2 lbs or 1kg of free range chicken breasts*
½ cup of breadcrumbs
2 large eggs beaten
Herbs if you are feeling fancy (thyme, rosemary, parsley, etc)
1-2 cups of shredded mozzarella and pecorino romano
½ cup oil for frying.

Tomato sauce – you will have some left over to freeze or use in another dish!
2 cloves garlic, smashed
¼ cup olive oil
Handful of basil leaves
2 x 750g containers or 26 oz of tomato sauce
A few fresh tomatoes diced

Roasted veggie side:
1 sliced eggplant (or 2 smaller Japanese eggplants if you can find em)
1 sliced squash or zucchini
1 red pepper de-seeded and sliced
1 large sliced onion
2 T balsamic vinegar
3 T olive oil
Salt and pepper to taste

* Free range chickens are way happier and taste a ton better.  In my mind, if you are going to go through the trouble of making something from scratch, may as well pay the extra dollar to have a better tasting and healthier meal!

Friday, July 29, 2011

Grilled Lollipop Lamb Chops [Tom & June]

This is one of those great foods you can eat with your hands. Some people believe lamb can taste gamey. The balsamic vinegar marinade will mask any gamey flavor.

What you will need:
~ Rack of Lamb - 8 chops
~ 1/4 cup chopped fresh rosemary
~ 1/3 cup balsamic vinegar
~ 4 minced garlic cloves
~ salt and pepper

Racks usually have 7 to 8 chops. You will need to cut them, have your butcher cut them or you can purchase them individually.

Place the chops in a baking dish. Salt and pepper. Pour 1/2 of the balsamic vinegar over the chops. Turn them over and then pour the remainder of the vinegar on top. Top with the garlic and rosemary. Cover and refrigerate until 10 minutes before you are ready to broil or grill. Do not marinate for more than 1 hour.


We grilled our chops and then added a balsamic reduction to add some pizzazz! Our side dishes are an eggplant tower and grits.

Sunday, July 24, 2011

Grandmother's Lemon Chiffon Pudding [Rhonda]


Grandmother’s Lemon Chiffon Pudding
Degree of Difficulty: Easy to medium
Time: 20 minutes prep, 50 to 55 minutes to bake in oven
Serves: 5 to 6

Truly fabulous cooks seem to stir up comfort foods with little or no effort, just love. This lemony dessert is one of my childhood favorites, made many times by my maternal grandmother. She was such a good Southern cook that at one point in her early years, she ran a boarding house in her tiny South Carolina hometown of Ward, providing hearty meals using the best Low Country meats and vegetables from area farms.

Her easy laugh was a genetic thing. At family reunions she and her siblings —- particularly Irene, Sadie, and S.T. —- would share stories and long-ago memories, and the sounds that followed began as a chuckle and rose to a full-on chorus of belly laughs. They had such fun. And the Southern feast that was laid out on an always-hot June afternoon was incomparable.

Straight from the oven, this dessert is ethereal, perfect for a snowy night when you crave something warm and satisfying. But chill it, and lemon chiffon pudding becomes a totally refreshing finish to a light summer meal, especially when served with ripe, just-picked strawberries or deep red raspberries.


Ingredients:
1 cup sugar (I use ¾ cup)
1/3 cup flour
3 tablespoons butter, softened
3 eggs, separated
1 tablespoon lemon rind
Juice from one lemon
1 cup milk
Butter to grease the souffle dish

Have all ingredients at room temp.


Sift together the sugar and flour. Mix in the softened butter. Add the egg yolks. Fold in the lemon rind and lemon juice. Add the milk, stirring until blended.
Beat the egg whites until stiff and gently fold into the mixture.

Pour into a buttered glass soufflé dish (mine is a 1.75 quart size). Place the souffle dish into a shallow pan of hot water (a 9-inch cake pan works great), and bake all of that in a 350 F oven (the hot water keeps the bottom of the dessert from burning).

After 30 minutes of baking, place a sheet of aluminum foil on the top of the souffle dish so the pudding doesn’t brown anymore. It then needs about 20 to 25 more minutes, for a total baking time of 50 to 55 minutes, depending on how true your oven is.


Serve warm or chilled.


Suggested soundtrack: Chopin’s Piano Concerto No. 1 in E minor, Op. 11, 2nd movement…one of the silkiest, most beautiful pieces of music ever written

Saturday, July 23, 2011

Bacon-Wrapped Dates and Pineapple [Rhonda]


When it's the kind of hot that much of the nation is experiencing today, I think back to a tropical vacation Mike and I took long ago. We had flown to Nassau, boarded a smaller plane for North Eleuthera, and then taken a boat to Harbor Island. It was boiling hot and steamy humid on that remote little dot of land in the Caribbean, yet pleasant with the cooling ocean winds. Silky pink sand, beautiful private beaches, and an ever-blowing sea breeze--that's what Harbor Island is all about.

Before dinner hour at the hotel, signaled by a long blast on the conch shell, there'd be a variety of appetizers. As we sat in beach chairs at the water's edge and watched amazing cloud formations and the setting sun, I had my first bacon-wrapped date/pineapple concoction. It trumpets the salty/sweet taste combination everyone loves and has been on the Koulermos dinner party menu--in all kinds of weather--ever since.

Bacon-Wrapped Dates and Pineapple

Degree of Difficulty: super-easy
Time: 15 minutes to prep if you're a slow roller, 20 minutes to cook
Serves: 8 to 10 as an appetizer

Ingredients:
1 package bacon
1 20-ounce can pineapple chunks
1 container pitted dates
toothpicks

Preheat oven to 425 F. Cut the slab of bacon in half so that you're using a half strip of bacon for each roll-up. (A full strip of bacon has trouble cooking all the way through) Slice the pitted dates longways so that you're using a half date per roll-up. Get a little work station going, with a pile of toothpicks, the date halves, pineapple chunks, and half strips of bacon.


Put the half date on top of the pineapple chunk and roll it up in the bacon. Secure with a toothpick. Place on a cookie sheet.

Bake on the top rack in the 425 F oven for 12 to 15 minutes, then take a look. From here on out, monitor progress until done, maybe another 5 or 10 minutes, making sure the bacon is done.

Tuesday, July 19, 2011

City Diner Home Fries [Tom]


My Dad owned a diner in Long Island City just south of the 59th Street Bridge. The views from the diner were of the Manhattan skyline. I was singing the Feeling Groovy song otherwise known as the “59th Street Bridge Song “by Simon and Garfunkel while preparing this dish.

Anyway, the diner was a stand alone classic. The construction was of a stainless steel exterior as well as stainless steel interior walls. It offered seating at booths as well as on the round swirly stools at the counter. As a kid, I did my share of pearl diving at the diner (Washing Dishes) mostly on Saturdays when my brother George worked half a day 6:00 a.m. to 3:00 p.m. We would ride the #7 train from Flushing at 5:30 a.m. to open for breakfast.

This recipe is dedicated to George’s memory.


Home fries are made from previously baked potatoes.
In the mornings the steam rose from the grill rising from the potatoes that cooked on the rear of the grill. As they were served more were added to the pile. George would toss them occasionally, cooking and browning them slowly. The odor filled the place. I wondered, how could any customer not order eggs with these potatoes?

For two you will need:

- 1 Large Baking Potato
- ½ Cup Diced Red Onion
- ½ Cup Red, Green or Yellow Bell Pepper
- 1 TBS Paprika
- 2 TBS Vegetable or Olive Oil
- Salt and Black Pepper

Use either a leftover baked potato or wash the skin of an uncooked potato. If microwaving, puncture 4 or 5 times with a fork, then wave for 4 to 5 minutes or until softened. Do not cook completely.
Set aside to cool before slicing.

Your choice, oven bake or fry the babies.

Slice the potato length wise then into ¼ inch slices.

In the oven, coat the bottom of a baking dish with 1 tbspn oil spread half the onion and pepper on the bottom then layer the potato slices coat the potato with the remainder of the oil. Spread the remainder of the onion and pepper on top. Salt, pepper and sprinkle the paprika on top. Top the dish with foil and bake at 350 degrees for 30 minutes.

Pan Fry. In a frying pan heat the oil. On medium heat add the onion, pepper and potato slices. Slowly flip. Add the salt, black pepper and paprika. Cook until slightly browned.

Spanako - Steaks [Tom]

NY Strip Steaks Stuffed with Spinach Filling for Two
(Tom)

Many steak restaurants serve spinach side dishes to compliment the steak. Some of these dishes are creamed spinach, spinach and potatoes or spinach with garlic and oil. We decided to make them as one.

20 minutes prep and 15 minutes to cook.

Here is what you will need:

- 2 1 to 1 1/2 inch thick strip steaks
- 1 cup frozen spinach
- 1 tsp minced fresh dill
- 2 Tbs minced onion
- 1/8 tsp nutmeg
- 2 dashes each salt and pepper
- 1/2 cup crumbled feta cheese
- 1/4 cup crumbled feta cheese (reserved)

Place the spinach in a microwave safe bowl and wave for 1 minute. Drain the spinach. Add all the ingerdients except the reserved 1/4 cup feta. Mix well.

Stand the steaks up on their sides. With a sharp knife cut a pocket. Do not cut all the way through. We marinated our steaks but it is not necessary.


Fill the pockets with the spinach mixture. Put 4 toothpicks through the meat to hold the mixture in while grilling or frying.

Cook to your desired doneness. Sprinkle the 1/4 cup crumbled feta on top.


We served the steaks with City Diner Home Fries.

Enjoy.

Monday, July 18, 2011

pizza dough [Matt]


margherita pizza w/ tomato, fresh mozzarella, basil
pizza may be the greatest food every created. its only limitation - a lack of creativity that the cook may have when topping the pie. i've been obsessed with pizza since i can remember and have been cooking it for years now. below is my recipe for crust and a few ideas for how you can top it.

dough - part 1
- 1 cup warm water in a tall glass (needs room for yeast to rise)
- 1/2 tablespoon sugar, add to water.
- 2 packets of yeast, add to water and stir mixture. place in a warm place for 10 minutes to let the yeast rise. successful yeast looks like a foamy (tan) beer. if you don't see foam, start over. your yeast is bad and won't rise.

dough - part 2
- in a large mixing bowl, pour in the yeast mixture
- add 2 pinches of salt
- add 1 1/2 cups flour. begin mixing by hand. add more flour so the mixture will begin to clump. once dough is able to be formed into a single large ball, without it constantly sticking to your hands, then it is ready. continue kneading the dough for another 3 minutes.
- place the dough in a clean mixing bowl that has been lightly oiled. place a dish towel over the top of the bowl and put in a warm area (a gas oven pilot light works great). let dough rise for 20 minutes.

remove the dough and preheat oven to 475f.

dough - part 3
- punch down the dough.
- flour a countertop and a rolling pin. roughly shape the dough into a thick version of a pizza shape.
- place the dough on the floured countertop. roll the dough out to the desired crust density. the dough will rise slightly, so go a bit thinner than you'd think.
- move the rolled out pizza crust to a lightly oiled pizza stone. if you don't have one, go get one. they're only $30 and it will change your life.
- add your base layer of toppings (tomatoes, cheese, etc.)


white pizza w/ ricotta, roasted eggplant, fennel, parmesan reggiano
place the pizza in the hot oven. depending on how good your oven is, the pizza can take 10 - 20 minutes cooking at 475f. keep an eye on it. you want the crust to be a deep golden brown. once the pizza has reached maximum sexiness, remove the whole pizza stone from the oven. this will help the crust continue to crisp as you add the rest of the toppings that should be added after cooking so that the do not wilt or cook.


((((cook track)))) Zeph And Azeem - Everything's Different

proscuitto di parma, pears, fresh mozzarella, pomegranate-infused balsamic vinegar reduction

Sunday, July 17, 2011

Grilled Artichokes For Two [Tom & June]

I remember eating artichokes when I was 5 years old. My Mom would stuff them with bread crumbs, herbs, garlic, cheese and either bacon or Italian sausage. They were pretty much a meal on their own. The stuffing was mounded on each leaf. The object was to eat your way to the luscious tender heart.

Some foods are made to eat with your hands and this is certainly one of those foods.

When in my 20's I frequented a pizza/Itailian restaurant on Second Avenue named Edwardo's. They made a mean stuffed choke similar to my Mom's except anchovies were substituted for the bacon or the sausage. It was always fun to bring someone new there. The owner/Maitre de was, I guess we could call him, a professional pick-pocket. Before you knew it he had my guests tie, wallet, jewelry, belt and more. It was always lots of laughs and good food.

When living in California, artichokes were a staple. Castroville, CA, is the artichoke capital of the world so chokes were always fresh. Californians typically serve them with either a mustard/mayo sauce or drawn butter. Over the years I have introduced artichokes to many people but I usually stuffed them until I found other ways to prepare them.

June and I ordered this appetizer at a Cheesecake Factory and loved it. I believe we pretty much duplicated the dish.

2 hour prep time and 1/2 hour cook time.
This is what you will need:

~ 1 Artichoke
~ 1/4 Cup Honey
~ 1/2 tsp Dijon Mustard
~ 1 Tbs Balsamic Vinegar
~ 1/4 Cup EVOO
~ 1/8 Cup Red Wine Vinegar
~ 1 Minced Garlic Clove
~ 1/8 tsp Onion Powder
~ 1/2 tsp Worcestershire Sauce

Preparation:

With a scissor cut the tips off the leaves. Careful not to get pricked. Also cut the top leaves off.


Next stand the choke on a cutting board with the stem up. With a serrated knife slowly cut down the middle of the stem into the leaf area so you have 2 halves.

Place the 2 halves in a pan of 3 to 4 inches of water. Partially cover, bring to a boil then turn the heat down cooking them at a slow boil for 30 minutes. Remove the halves when cooked, drain and place on plate. Cover and refrigerate for a least 1 hour. (this can be done a day or two in advance)


When ready to grill, spoon out the choke (hairy part) of the artichoke. Careful not to scoop out the heart.

The Dip:

Pour 1/2 tsp of EVOO in a saute pan on low heat. Saute the garlic for 1 minute, then add the other ingredients. Stir for 2 minutes. Slowly pour in the remaining EVOO while continuing to stir. Cover and set aside. We will heat prior to serving.

Grilling:

Brush each half with olive oil. Season with salt, pepper and garlic powder.

Grill the halves on medium to low flame for 7 minutes on each side, only turning them once.
Heat the dipping sauce and serve.

Thursday, July 14, 2011

Summer Salad with Grilled Pears & Cherry Dressing [Tom & June]


Serves Two

Dressing:
- 2 Tbs Cherry Preserves
- S & P
- ½ tsp Worcestershire sauce
- ½ tsp Balsamic Vinegar
- 2 Tbs Red Wine Vinegar
- 1 Minced Garlic Clove
- ½ tsp Honey
- 1/8 cup or less EVOO

Add all ingredients except oil in a small bowl. Whisk or stir combining the ingredients.
Then, slowly add the oil while stirring.

Place in refrigerator until ready to serve.

Grilled Pears:
- 1 Pear seeded and cut into quarters.

Lightly coat with olive oil and grill. Not necessary to “cook” all the way through. You want some nice grill marks and to “warm” the pear.

To assemble:

- Lettuce (we used green leaf)
- 2 oz. Goat Cheese
- 1 Grilled Pear
- 1/4 cup Walnuts or Pecan Pieces


Place lettuce on 2 plates – add pear sections, top with goat cheese and chopped nuts, finish with the cherry dressing. Voila!!

Monday, July 11, 2011

Black Bean Soup [Rhonda]


Degree of difficulty: easy
Time: 1 hour to soak beans, 10 minutes to prep, 90 minutes to 2 hours to cook
Serves: 6

Soup is one of those satisfying, easy-to-make deals. Freeze it in batches and you've got a quick answer to that what's-for-dinner dilemma we all face after a long day at the office.

My love affair with black bean soup began one chilly October night back in South Salem, NY. Nancy and Ted Preizler had invited a house full of young kids--all friends of their sons Ryan and Scott--plus assorted parents. Birthday? Early Halloween? I don't remember. But despite all the happy noise and confusion that goes with such a crowd, the black bean soup made you sit up and take notice. It had that heady orange scent layered in, and was amazing.

This one is a combination of recipes, gets points for being healthy, and is versatile. Take it in a multitude of directions: add a scoop of salsa and chopped cilantro for summertime fun, or hike up the amount of orange juice and garnish with orange peel, or do a curried sour cream, or go hearty in winter with diced, sauteed kielbasa or black forest ham.

Ingredients:
1 lb. dried black beans
6 cups boiling water
1 tablespoon olive oil
1 or 2 cloves garlic, minced
2 cups chopped onions
1 1/2 tablespoons oregano
1 or 2 bay leaves
1/2 teaspoon crushed red pepper (or more if you're the spicy type)
49 1/2 ounces chicken stock (large can)
8 ice cube tray squares of homemade chicken stock (optional, but fabulous)
1/4 cup orange juice
Sour cream, julienned orange peel, chopped flat leaf parsley or cilantro as garnish

Place beans in large bowl and cover with 6 cups boiling water.


Let soak 1 hour, then drain beans and set aside.

Heat oil in large stock pot, add onions and minced garlic, cook, stirring, for about 3 minutes.


Add oregano, bay leaf, crushed red pepper, and cook 1 minute. Add drained beans and canned chicken stock (and the frozen homemade chicken stock cubes, if using). Bring mixture to simmer. Lower heat and cover.

Simmer soup until beans are tender, about 90 minutes. Remove lid. If too much liquid has evaporated, add a bit more stock (up to 1 cup). If soup seems too thin, cook, uncovered a little longer until thicker. Add orange juice and cook 1 minute more.

Remove bay leaf. I like to puree about 3 cups of the soup in the food processor to give a smooth base for the rest of the beans.

Taste and season soup with salt. Garnish with one of the above-mentioned toppings.

Suggested soundtrack: "On the Floor" by Pitbull and JLo

Wednesday, July 6, 2011

Greek Chicken Eggplant Burgers [Zack]

I have recently taken a liking to eggplant. I think it's vastly underrated as a main ingredient if you want to exclude meat from your meal, or even as a supplement. In this recipe, I decided to "beef up" the chicken patties with a bit of veg. Since eggplant is like a sponge, it soaks up all of the great chicken juices and keeps them in the burger instead of ending up in your pan. Being able to reduce a bit of meat in my diet without giving up anything on flavor seems to be a win-win. Plus, you can trick your kids into eating vegetables!


Process:

Start by dicing shallots and zebra-peeling your eggplant. The skin of an eggplant is bitter, but contains some nice nutrients, so you can settle for the best of both worlds by using 1/2 of the skin.


Dice your eggplant into small 1/8 inch cubes.


Add shallots with about 1T of olive oil to a pan on medium heat. Let them cook slowly until they are translucent  Then add the diced eggplant and let cook for about 8 minutes until it's softened and lightly browned. If you feel inspired, you can add numerous dried spices here such as oregano, parsley, and cilantro.  Add some diced garlic if desired and add a touch of salt.  Cook for 2 minutes more.

Let the eggplant cool off and start preparing your Greek yogurt sauce.


Dice onions, tomatoes, cilantro and feta cheese. Squeeze out the tomato water to make sure the sauce doesn't get runny. Mix with the yogurt.


Make sure your ground chicken is as cold as possible, and add in the cool eggplant mixture. Also, sprinkle a bit of salt, cumin, and cheyenne. Mix this together lightly and form into patties.


Add them to the pre-heated pan on medium-high heat. I chose to use a non-stick pan with some oil in there because I was afraid of the patties falling apart. They held together beautifully! Cook for about 6 mins per side and test the doneness by pushing on it with your finger.  It should feel firm and only slightly bounce back.


Toast buns or bread (I chose to use my Artisinal bread recipe baked with caramelized onions on top). Add the Greek sauce, then a splash of Sriracha (if you can handle it!), then the burger. I cut my burger in half to fit the bread. Enjoy!


Recipe:
1 diced medium onion or 2 large shallots diced
1 eggplant (zebra-peeled) in 1/8 inch dice
2 lbs / 1 kilo of ground chicken
1 T cumin (half for the Greek sauce and half for the burger mix)
1 tsp dried oregano
1 tsp dried parsley
1 tsp dried cilantro
1/2 cup unflavored yogurt
1/3 cup crumbled feta
1 small diced red tomato, squeezed to remove the water
1/8 cup diced cilantro
salt and pepper to taste
toasted buns or bread

Monday, July 4, 2011

Rigatoni Soup from Cyprus [Mike]


My Mom and Dad never had a car. Never occurred to them to get one either, living in New York City. Neither of them knew how to drive. Everywhere we went we traveled by bus or the subway. Our occasional trips to see my dad’s brother, Uncle Charlie,and his family was a long haul to Brooklyn on the transit system… just one stop before Coney Island.

Aunt Nancy would always serve a traditional Cypriot dish, a chicken soup. (Dad and Uncle Charlie are both from Cyprus, the island in the Mediterranean off the coast of Greece.) She would go to the poultry market and get a freshly killed chicken to make the soup. She would then cook rigatoni macaroni in the soup. It was always served with a plate of freshly grated Pecorino Romano cheese to sprinkle on top. The Koulermos brothers always waited politely until everyone took their share of cheese, and then went back for a second helping. Sprinkle?

My three brothers and I called it “Rongi Soup” because we couldn’t say macaroni. Mom soon mastered the dish and we had it every couple of weeks.

On Saturdays, Mom would give me $5.00 to go to the chicken market where they had live poultry.  I would walk from 115th Street where we lived to 103rd Street in NYC. I would go inside the market (the smell was awful) and ask one of the sales people if I could have a 6 or 7 pound soup chicken.  He would pick one from the cages and show it to me. Then it was curtains for the chicken.

Years later Rhonda learned how to make Rongi Soup from my mom. All three of our boys love Ron’s chicken soup.

My boys always loaded their Rongi Soup with an enormous amount of freshly grated Parmesan cheese. As the saying goes, “The apples doesn’t fall far from the tree.”

Note: I’ve never seen this dish in any restaurant.

Ingredients
1 (3-4 pound) whole chicken
2 carrots, chopped
2 stalks celery, chopped
1 large onion, chopped
salt and pepper to taste

Directions

Put the chicken, chopped carrots, celery and onion in a large soup pot and cover with cold water.  Heat and simmer, uncovered, until the chicken meat is tender (skim off foam every so often).

Take everything out of the pot. Strain the broth. Place the soup back in the pot and bring to a boil.

Add Rigatoni or Penne pasta. Cook until the pasta is al dente. The chicken can be served along side or put into the soup. Season the broth with salt, pepper.

Sunday, July 3, 2011

Grilled Bronzed Tilapia [Tom & June]

One of my favorite dishes to order is blackened fish or chicken. Alot of times the chef over-does the seasoning or it's too heavy with black pepper. On a trip to the west coast of Florida, I discovered a happy medium between blackened and "blah" when I saw "bronzed" on a menu. It was perfect - and looked like a piece of fish that had been "bronzing" in the Florida sun! This works for chicken and of course, any type of fish.

So I searched on-line for recipes for the seasoning and with some tweaking, this is our version.


Bronzing Seasoning
1 1/2 tsp Salt
3 tsp Paprika
1 tsp Oregano
1 tsp Garlic Powder
1/2 tsp Dry Mustard
1 tsp Onion Powder
1 tsp White Pepper
1 tsp Basil
1 tsp Thyme
1 tsp Black Pepper
1 tsp Cayenne Pepper

Mix all ingredients. We put it into an empty spice container with a shaker top.

Brush the fish filets with olive oil and sprinkle with a generous portion of the seasoning. Using the brush, dab and brush the seasoning onto the fish to evenly coat. Do the same to the other side. We threw in some zucchini and orange bell peppers to grill for sides.


Grilling fish can be intimidating but it really is easy. If you have a grill basket, you can use that. If not, spray Pam on the grill. IF YOUR GRILL IS HOT - BE CAREFUL THAT IT DOESN'T FLARE UP!

Grill for about 5-7 minutes per side. You only want to turn once, so check to be sure that it's cooked to your liking before turning. Use a spatula and carefully remove.