Wednesday, March 28, 2012

Limited Kitchen – BBQ Chicken Sandwich [Matt]

My office is great. Nice people, free beverages, located right near the beach – all round pretty awesome… well minus the kitchen.


We have a microwave and a toaster. This poses a problem. What can you do for lunch with such limited resources? Answer: Hack together a bomb BBQ Chicken Sandwich.


On your next weekly trip to the grocery, pick up 1lb of low sodium sliced chicken, favorite BBQ sauce, sliced mozzarella, dill pickles, and whole wheat buns.

Packing the sandwich is essential.

Use three sandwich baggies or a large-divided tupperware container. Place 1/3lb of sliced chicken, 1 slice of mozzarella, and a large squirt of bbq sauce into one baggie. Place a whole wheat bun into another baggie. Place 3 – 6 dill pickle slices into the final baggie.These ingredients MUST remain separate for anti-soggy sandwich success. Place the three baggies into your favorite lunch pale and shove it in the fridge when you arrive to work.

Oh hey, now it's lunch. You hungry? Me too. I really hope this sandwich doesn't take more than 5 minutes to make, otherwise I'll eat my hand (don't worry it only takes 2.345 minutes to make).

1. Put the whole wheat bun in the toaster - set to your darkening preference.
2. Place the chicken/ cheese/ sauce pile onto a plate. Put that into the microwave for 1 minute.
3. Open pickle bag.
4. Now that the bun is toasted, take your warm pile of awesome out of the microwave. Plop it onto the bottom half of the bun.
5. Place your pickles in some geometric pattern on top of the deliciousness.
6. Drop the top bun on. Compress slightly to convince co-workers that you have a panini press hidden somewhere in the office.
7. Enjoy.

Tuesday, March 27, 2012

Vegetarian Three-Bean Chili [Rhonda]


Degree of difficulty: easy
Time: 20 minutes prep, plus cooking time
Serves: 6 to 8 and it freezes well

Call it homework. For two reasons. One, it's healthy, so you're doing your body some good. You know, for your legume quota. Secondly, this is a mother of a recipe--it makes a lot. So freeze it in manageable container sizes and you've got a nice meal some other night when you're dog-tired.

It's almost the Chipotle experience--just add some lime/cilantro rice and you got it.

Vegetarian Three-Bean Chili
Ingredients


1 tablespoon extra-virgin olive oil
2 medium carrots, finely chopped
1 large onion, finely chopped
1/2 jalapeno chile, seeded and minced
3 large garlic cloves, minced
1 1/2 teaspoons dried oregano
1 1/2 teaspoons ground cumin
1 1/2 teaspoons chili powder
1 chipotle chile (or more hey hey hey) canned in adobo sauce, minced
1 can (28 ounces) crushed tomatoes
1 bay leaf
1 can (15 ounces) kidney beans, drained and rinsed
1 can (15 ounces) black beans, drained and rinsed
1 can (15 ounces) pinto beans, drained and rinsed
2 cups water
Splash of white wine if you want
Salt and pepper to taste
1/2 bunch Swiss chard, stems removed, leaves cut into 1 inch pieces
1 tablespoon cilantro, plus sprigs for garnish
1 avocado (optional) peeled and sliced for garnish
Lime wedges, for serving
Sour cream and shredded extra sharp cheddar if you're not being pure

Heat oil in a large pot over medium heat. Add carrots, onion, jalapeno, and garlic and cook until softened, about 10 minutes. Add oregano, cumin, chili powder, and chipotle, and cook, stirring constantly for 2 minutes.

Add tomatoes, bay leaf, beans, water, salt and pepper. Bring to a simmer. Cover, and reduce heat to medium-low. Simmer for 1 hour.

Discard bay leaf. Add Swiss chard, and cook, uncovered, until mixture has thickened slightly, about 20 minutes. Stir in chopped cilantro. Garnish with avocado and cilantro sprigs, and serve with lime.
Optional: top with sour cream and shredded cheddar cheese.

Suggested soundtrack: Bach's Brandenburg Concerto No.l 5 Allegro. I mean, Bach and beans. What could be better?

Tuesday, March 20, 2012

Roasted Vegetable Gratin [Zack]

Here is a nice non-meat side dish or appetizer that you can easily whip up.  Roasting the vegetables first in the oven adds a deeper flavor profile.  This is great next to a grilled chicken breast or a sandwich!


Process:

Pre-heat your oven to 400 F / 200 C.  Wash and slice your eggplant and squash.  You want them to be about 1/4 of an inch wide and even thickness so they roast evenly.  Add a splash of olive oil to your baking trays and add your slices of vegetables.  Sprinkle them with salt and black pepper and roast for about 20 minutes until nicely browned.

When the veggies are roasting, we have time to make a simple red sauce.  Dice 1/2 an onion and put in a low pan with 1 T of olive oil.  After 3 minutes, put in 2 peeled garlic cloves and a few fresh basil leaves.  Cook for 2 minutes and then add your pureed tomatoes.  Let this cook for about 10 or 15 minutes until nicely reduced.  Add a pinch of salt and black pepper.


Cover the bottom of a baking dish with a thin layer of sauce.  Arrange your roasted veggies in the dish.


And then top with the grated cheese and breadcrumbs.  Bake this at 400F / 200C until it's heated through and the top is nicely browned.


Ingredients:
1 eggplant
1 yellow squash
1 green squash
1 or 2 T olive oil
1/2 cup gruyere cheese

28 oz tomato puree
1/2 medium onion
2 cloves garlic
handful of fresh basil leaves
1 T olive oil

Song:  Pharrell Williams - Take it off

Tuesday, March 13, 2012

Drunken Spaghetti [Nick]

Degree of difficulty: easy
Time: 45 minutes (includes prep)
I know what you’re all thinking…no, unfortunately, this pasta doesn’t take you into a state of inebriation. However, what this pasta CAN do is make your taste buds drunk with happiness and longing for more.

I’m no expert cook, let’s be honest. In fact, after working all day and then going to the gym or running, I’m usually exhausted by the time dinner rolls around. I usually look for three key elements in dinner: simplicity, quickness, and taste. Often times those three elements don’t combine very well (see: Fast Food), but I have found a meal that is both swift and delicious.

To cook the pasta for this dish, I used a cheap bottle of red wine, combined with water. The pot should be at about 50/50 with water and wine. Some people may choose to use a leftover bottle of red, which also works (see: ‘not finishing your alcohol’…for shame). Bring the water to a boil, and simply cook the pasta as you normally would. When the noodles are finished, they should be a light purple color, and will have absorbed the taste of red wine…paradiso!

As the pasta is boiling, take the pancetta and cook it in a frying pan on a medium-low heat. This type of bacon cooks a little differently from regular bacon, so make sure you are watching it carefully. Throw some fresh-ground pepper onto the pancetta, and smell the glory.

When the bacon is done cooking and the pasta is ready, strain the noodles but leave a fair amount of the wine/water in the pot, as you will use some of this for your sauce in just a few short steps.

Take the noodles from the pot and add them to the pan with the pancetta. As the noodles are being added, toss in some ricotta cheese. This helps thicken the sauce, so it is up to your discretion on how much to use. Continuously stir and mesh the noodles with the ricotta. At this point, I added more of the wine leftover from the pot to ensure that my dish was flavorful and captured the full essence of the red wine. Toss in some more fresh-ground pepper and a bit of salt, and you are ready to plate.


Plate the purple-hued noodles, ensuring that there is plenty of pancetta in the serving. At this point, take a spoonful of finely chopped walnuts and sprinkle over top. Don’t worry; the best part is still yet to come…


Parmigiano-Reggiano...Pow! Add some to the top of the dish and you’ve got yourself one fine looking plate of food. The cheese adds a bit of saltiness to the dish…so, if you must….over-cheese, please do not over-salt.


Disclaimer: I made some baked asparagus on the side. All you need is a bit of olive oil, pepper and salt. Throw it in the oven, turn’em, take’em out and enjoy.


Ingredients:
Pack of Spaghetti
Bottle of Red Wine
Pancetta (1/2 lb)
Ricotta Cheese (discretionary)
Parmigiano-Reggiano (lots)
Walnuts (handful)
Salt/Pepper

Sunday, March 11, 2012

Lamb and Roasted Butternut Squash Curry [Zack]

Indian food is one of my favorite cuisines.  I got introduced to it pretty late in life - in college by my Indian exchange student friends.  I've been making up for lost time ever since.

The first dish I ordered was the ubiquitous Butter Chicken.  I loved how silky-smooth the sauce was, the complexity of the spice mixture, and the kick of heat at the end of each bite.  I quickly learned that Butter Chicken was not the only good dish that the Indian culture had to offer and quickly expanded to favorites such as Saag Paneer, Dhal soup, Chana Masala, Lamb Vindaloo, etc.

If you like butter chicken, this recipe is the next logical step to branch out.  The butternut squash and coconut milk create a very smooth curry that feels like you are riding in a luxury sedan.  The cardamom spice sings over top the flavors and really gives it an interesting twist.  If you prefer pumpkin, feel free to substitute it for the squash.  If it's too intimidating finding and grinding those spices, you can always use a curry paste from the grocery store.  You can add spice directly proportional with the amount of chest hair your dinner guests will have.


This curry is dedicated to Gita Pitel - thanks for teaching me how to cook Indian food!


Process:

Pre-heat your oven to 400F / 200C.  Cut the butternut squash in half, scoop out the seeds, and coat lightly with olive oil or peanut oil.  Sprinkle with salt and roast until caramelized - about 30 minutes


Next, while your squash is roasting, you'll want to toast your spices for your curry paste.  In a frying pan over medium heat with no oil, add the cumin seeds, dried chiles, fenugreek seeds, mustard seeds, anise seeds, and seeds from 7 cardamom pods.  Toast until you can smell the spices and they are slightly browned, about 5 mins on med heat.  Make sure to shake the pan around so they they toast evenly and don't burn


Grind them up in a mortar and pestle.


Add in roughly chopped minced garlic, ginger, and birdseye chiles (take out the seeds for less spice).  


Mash to a paste.


Cube the lamb shoulder, cutting off as much fat and silver skin as your sanity will allow.  Alternatively, you can save 5-10 minutes by buying cubed lamb.


Brown the cubes in batches in 2 T of oil in a large pot.  Don't over-crowd the pot or else you won't get proper browning.  Transfer each batch to a plate.  


Once you are finished cooking the lamb, add your diced onions to the empty pot.  Cook for a  few mins in the lamb goodness. 

Your squash should be about finished by now.  Pull it out of the oven and keep it nearby so you can scoop it out into your soup pot with a spoon.


Add your curry paste to the onions and cook for 2 more mins until fragrant.  Watch out – the spice may get into the air and pepper spray the room if you add a lot!  


Add 1/2 of your roasted squash into the pot along with your chicken stock.  Let this come up to a gentle simmer and then blend the whole thing with a stick blender or in your food processor.  This will smooth out your sauce and provide a nice base for the curry.


Start your rice.  Toast 1T of cumin seeds in 1T of oil or butter before adding the rice according to the directions on the box.


Add the lamb back in.  Also add in your curry leaves and the rest of the squash to the pot.  Give it a good stir.  You'll get a pleasant contrast between the smooth and creamy base and the chunks of squash. 


Keep stirring for about 10 minutes, add your turmeric powder, coriander powder, and taste to see if you want to add any chile spice (lal murchu).  Adjust the salt content as well.  Simmer for about 10 more minutes to thicken it up.  The last step is to add the coconut milk into the curry.  This will take it over the top!


Check one last time for salt and spice content.  Serve over some freshly-made cumin rice.  For garnish, dice an onion and sprinkle lemon juice over the top of it.  


Ingredients:
Instead of the below spices, you can use a red curry paste from the grocery store.


1 2 lb boneless lamb shoulder, trimmed and cubed
2 cups of cubed pumpkin, roasted
1.5 cups chicken stock
1 medium onion, diced
2 inches ginger
2 large cloves garlic
2 birdseye chiles
2/3 tsp cumin seeds
4 dried chiles
1/3 tsp fenugreek seeds
1/3 tsp mustard seeds
1/3 tsp anise seeds
1/3 tsp cinnamon
7 cardamom pods (only the seeds)
1/2 tsp tumeric
1 tsp ground coriander
10 curry leaves
1/2 cup coconut milk

1 cup basmanti or brown rice
1 T cumin seeds

garnish:
1 medium onion, diced
juice from 1/2 of a lemon

Song to cook that curry:  James Brown - the payback

Monday, March 5, 2012

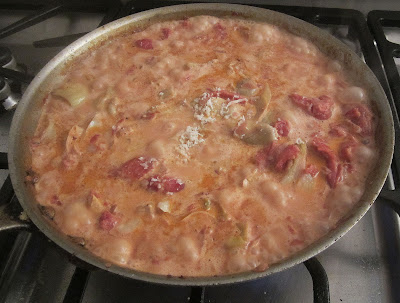
Chicken with Artichokes, Cream and Tomatoes [Rhonda]


Degree of difficulty: easy
Time: 35 minutes (includes prep and cooking and is worth it)
Serves: 6

Is there nothing left to do with boneless breast of chicken? Well, as long as Mark Bittman keeps writing columns for the Times Sunday Magazine (see Feb 5, 2012) about it and getting paid for it, there must be a market.

Actually, this recipe is not from Bittman. It's from Rafferty. Peggy Rafferty. She's on par with Bittman, no kidding. She was one of the best contributors to the cookbook, "A Taste of New Albany." That cookbook may not've been on a NYTimes bestseller list, but it did raise quite a bit of money for New Albany's middle school back in the day.

It's a solid way to play with artichokes and makes for a nice meal.

Chicken Breasts with Artichokes, Cream and Tomatoes
Ingredients:

6 chicken breasts, split
14 ounce can peeled tomatoes, drained and chopped
Salt to taste
Pepper to taste
Dash of cayenne pepper
10 ounce can artichoke hearts (in water, not marinade)
3 tablespoons olive oil
1/2 cup heavy cream
1 small onion, finely chopped
2 cloves garlic, minced
1 tablespoon chopped fresh basil
1/4 cup grated parmesan cheese
1 cup chicken broth (use those frozen chick stock cubes if you have them!)
1/4 cup white wine

Rinse chicken and pat dry.


In a large frying pan, heat olive oil over medium high heat. Add chicken, sprinkle with salt and pepper. Cook 3 to 4 minutes on each side, until lightly browned. Drain excess oil from skillet.

Add onion, garlic, wine and broth to pan. Cover and simmer for 20 minutes, or until chicken is fork-tender. Remove chicken from pan. Reduce juices until reduced to 1/2 cup, three to five minutes. Add tomatoes and artichokes to pan.


Cook one minute. Add cream, parmesan cheese and basil, simmer until liquid is reduced to 2 cups, six minutes.


Season with salt and pepper, a dash of cayenne pepper if you like. Return chicken to pan, heat briefly and serve.

Suggested soundtrack: Maurice Ravel's "Pavanne pour une infante defunte"

Friday, March 2, 2012

Confit de Canard - Duck Leg Confit [Zack]

What is confit?

Confit is a fancy french word for slowly poaching meat (usually duck meat) in fat.  For duck or goose leg confit, you slowly simmer the legs in goose fat.

Confit seems very intense - why should I try it?

Duck leg confit is one of the most flavorful and enjoyable meals you can make.  If you are busy, you can make a large batch and store it in the fat in your fridge for MONTHS.  Then if you are too busy to cook one night, pull the legs out of the fat, place them in a low pan to crisp the skin and warm the meat through.  Toss a salad and you are finished!

Well, is it difficult?

It's not actually that hard, it just takes a bit of planning and a lazy weekend day that you can spend cooking.

You cure the duck legs in the fridge (i.e. rub them with salt) and then slowly poach them in fat (i.e. place them in a pot, cover with duck fat or olive oil and put the heat on low and wait for 3 hours).

Why goose fat?

Goose fat is God's gift to mankind because we have to deal with pain and suffering in this world.  Either cook some confit in it or roast some potatoes with it.  You'll know what I mean.

Where can I find goose fat?

You can find it in a premium grocery store.  Or you can render it yourself by buying a whole duck, removing the breasts for another use, reserving the legs for the recipe, and roasting the bones and skin in the oven at 250 F / 125 C.  Or you can just use olive oil.


If you haven’t tried confit before, I firmly suggest that you dive right in and make a large batch.  I did my first batch with only 2 legs and immediately regretted not making more after my first bite.  It’s more economical to make a large batch– it takes the same amount of time, you use less oil, less heat energy, and you have more leftovers that last a long time in your fridge. 

If you are nervous about how long it will take, I put some notes of how a typical Saturday / Sunday would look making confit.

Process (Saturday – i.e. The day before the main event):

[10:00 am] go shopping for groceries.  Pick up a few ducks and some extra legs at the really cool butcher market

[11:00 am] return home from shopping, put the groceries for the week away, grab the ducks you plan on separating

If you bought a full duck or 2, you have a bit of work to do.  Look for the section at the end of the post on how to separate out the breast and legs.


[11:15 am] you have separated out the duck legs and breasts and have popped the rest of it in the oven to render the fat

[11:20 am] mix together the cure in a bowl.  You want to cure the legs for flavor.


Combine your sea salt, thyme leaves, chopped garlic, and ground pepper into a bowl and mix.  


[11:25 am] rub a generous amount of salt onto both sides of the legs, making sure to get the inside of the legs well.  Place them skin-side down into a baking dish or container and pack them well together.  Wrap with saran wrap and place in the fridge.

[11:30 am] go do something else

[12:00 pm] pull the duck carcass out and pour the fat into a jar and stick it in the fridge.  Stick the bones in the freezer for stock later.

Let them cure in your fridge for 12 – 24 hours.


Sunday afternoon – the day of the great confit:

[2:00 pm]  get the duck legs out of the fridge and wipe off the cure with a paper towel

[2:05 pm]  arrange the legs in a large heavy-bottomed stock pot, and cover with the duck fat (or olive oil).


Add a few unpeeled garlic cloves - if your duck fat was in the fridge, it may have solidified.  No problem!  Turn it on to low heat and walk away for 20 minutes.


[2:30 pm]  check back to see if the oil is slowly bubbling (simmering).  Go turn on a movie or chase the kids around.

[3:00 pm]  time for a quick stretch – put the movie on pause and check to see if it’s still slowly bubbling.  If yes, say something about how good of a cook you are.  If no, discreetly adjust the heat and then say the same thing.

[3:30 pm]  another check – maybe give it a stir if one leg is partially sticking out

[4:00 pm]  still good?

[4:30 pm]  you guessed it.  Check and stir.

[5:00 pm]  take a knife out and prick a leg. It should pass through fairly easily (like pulled pork).  Remove the pot from the heat and let it cool off (should take a while).


[5:30 pm]  remove the legs to a tupperware and cover them with the cooking fat.  These will keep for a few months in your fridge (the fat will solidify and preserve the legs), ready to be used when you need them.


A random crazy weeknight that you want to eat the confit:

When you want to cook a few legs, take the container out of the fridge and wipe the fat off the leg with your hands.   Place it into a cold pan set on low and slowly brown the skin.


Once the skin is crispy on one side, flip.  Serve once the meat is heated through!


The meat should pull like pulled pork, so you can even make a nice sandwich if you want!


Ingredients:
(for about 8 legs)
8 duck legs
4 T sea or kosher salt
cracked black pepper
1 minced shallot
1 T chopped rosemary or thyme
2 cloves chopped garlic

~3-4 cups duck fat (or olive oil, or a combination of both) - this depends on the size of your pot, just cover the legs with it.
5 whole garlic cloves

How to separate the breast and legs from the bird:

You’ll need to separate out the breast and legs from the body.  If you have ever carved a chicken or turkey, the anatomy is almost identical.  Start with the neck facing you and slice along the center bone of the chest (the bird’s sternum).  Cut down until you feel bone, then slowly separate the breast meat away from the bones following the line of the rib cage.  Cut all the way around the breast and make sure you don’t tear the skin.  The breast of the duck is super tasty if cooked correctly (i.e. just start it skin-side down in a cold pan, turn it on low and slowly render the skin.  Once it’s nicely browned, flip the breast over in the pan and pop it in the oven until it’s medium-rare.)

The next step is to separate the legs away from the carcass.  Wiggle them around a bit until you can see the outline of the leg.  Cut through the skin so the leg is fully covered with it (i.e. cut with the knife up against the ribs on the carcass).  Then find where the leg connects with the rest of the body (the duck’s hip), and place light pressure on it until it pops out of socket.  Cut right where it separated and it’s that easy!


Pop the rest of the bird into the oven at 300 F / 150 C to render the fat and give you materials for a free batch of duck stock.  You’ll probably get about 1 cup of duck fat per duck carcass – very economical!

Song:  Parliament:  I've Been Watching you 

Thursday, March 1, 2012

Chocolate-Coconut Cheesecake Squares [Rhonda]


Degree of difficulty: can you melt chocolate? are you handy with a mixer?
Time: 10 minutes prep, plus baking time
Serves: many

Martha Stewart comes through! This recipe is from her mag, and if you cut it small like she tells you to, makes a flavorful bite after a meal. It's a nice combo of cheesecake and chocolate, but kinda rich, so don't cut into brownie slab sizes.

Chocolate-Coconut Cheesecake Squares
Ingredients:

2 cups finely ground graham crackers
3 cups (10 ounces) finely shredded unsweetened coconut (Martha calls for dessicated coconut. I went to three stores, with no luck. I used regular sweetened coconut and nothing exploded, nobody changed into a pumpkin. Martha should be bitch-slapped.)
5 ounces semisweet chocolate
2 ounces unsweetened chocolate (Baker's works.)
3/4 cup sugar
1 stick unsalted butter, cut into 2-inch pieces, plus more for the pan
3 large eggs plus 5 large egg yolks
12 ounces cream cheese, room temperature

Preheat the oven to 350 F. Butter a 9-inch square baking pan. Line with parchment paper, leaving a 2-inch overhang on 2 sides.


Butter parchment.

Stir together graham cracker crumbs and 2 cups coconut.


Place chocolates in a heatproof bowl, and set over a pan of simmering water.


Heat, stirring, until melted. Add butter, and stir until melted and smooth.


Remove from heat, and let cool slightly. Whisk in 1 egg.

Stir chocolate mixture into coconut mixture.


Press evenly into prepared pan. Bake until set, 10 minutes. Transfer to a wire rack, and let cool in pan.

Using a mixer fitted with a whisk attachment, beat cream cheese and sugar on high speed until very smooth and fluffy, about 5 minutes. Reduce speed to medium, add egg yolks and remaining 2 eggs, one at a time, until well-combined.


Scrape sides of bowl. Beat on medium-high speed until completely smooth, about 3 minutes.

Pour over cooled crust. Sprinkle remaining cup coconut evenly over the top.

Bake until top layer is just set and coconut is golden brown, 40 to 45 minutes.


Let cool completely in pan on a wire rack. Refrigerate, loosely covered, until chilled or overnight.

Run a sharp knife around edges of pan and use parchment to lift out cheesecake. Cut cheesecake into 1 inch squares, wiping knife clean between cuts. (Another great Martha tip!) Serve immediately, or refrigerate in an airtight comtainer for up to one week.

Suggested soundtrack: Martha recommends LMFAO's "Shots"