Friday, October 14, 2011

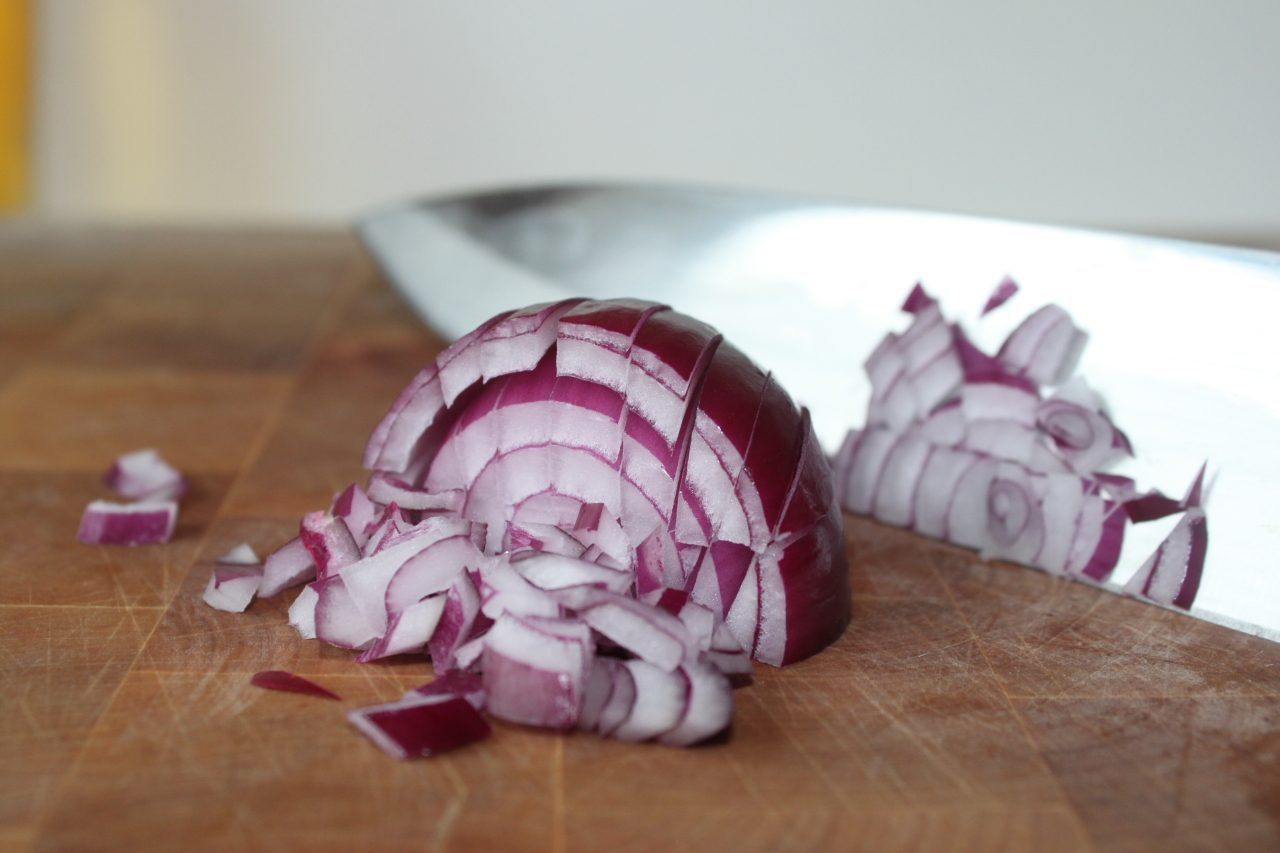
Technique: How to Dice an Onion Like a Chef [Zack]


This is the best way to dice an onion quickly and evenly.  As you are learning the technique, it may feel slower in the beginning, but once you practice a bit, you can knock out quite a few onions in the time it used to take to do one.  It also offers you more control: adjust the thickness of the dice by spacing out your cuts to your liking.

Slice the onion in half from head to root.  Take off the outer skin and lay the onion flat on your cutting board and slice off the tops off of the two halves.  You want to keep the root on and intact because it will keep the whole situation together.  

Make one or a few horizontal cuts through the onion (depending on how thick the onion is).  Stop before you reach the end of the root.


Next, hold the sides of the onion, and make vertical cuts through the onion.  Again, don’t cut into the root.


 If you have a paring knife, you can use it to make the horizontal and vertical cuts.  I’ve survived without one for 7 years, so I think you will be okay. 

Now, take your chefs knife and slice the onion across the first 2 cuts so you have a nice dice.  Slice all the way up until you hit the root.  If there are a few stubborn big pieces, you can rock the knife through a few times. 

Song:  The Roots - Break you off

Monday, October 10, 2011

Replicating my Mom - Chicken and Steak Marinades [Nick]

In many respects, it is easy for a young man to look up to his father. What kid wouldn't want to be a big, loud, brash, and overly abrasive New Yorker? (That question is rhetorical...don't actually answer that). I've always thought it was easy to see what traits and qualities I emulate in my father; a booming voice, an exuberant personality, and I love having everyone's attention.

My mother on the other hand is a different story. She's a fabulous-looking, hyper-intelligent, hell-of-a-cook kind of gal. Sorry Pops, but Mom's got you beat...
So naturally, emulating my mother tends to be a bit more difficult.
Do I look like her? I'd like to think so, but I suppose the quality of looks could be up for debate...
Do I cook like her? Fat chance...
What better way to try to be a little more like my mom than take her recipes (that have already been posted), and re-create them myself. With cooking, sometimes you get fabulous results, and sometimes you just get lucky. This circumstance was a little bit of both.
Growing up my mother would always take an incredible cut of london broil, marinade it for hours, then grill it to perfection. On this night, I attempted to re-create her marinade for my own steaks. Here is the London Broil recipe:
½ cup soy sauce
¼ cup minced fresh ginger
¼ cup slivered lemon zest (peel lemon with veg peeler, then chop with knife)
8 teaspoons Asian sesame oil
4 cloves garlic, minced
4 teaspoons coarsely ground black pepper
4 teaspoons brown sugar

Combine marinade ingredients, pour over London Broil or any other delicious steak (can use zip lock baggy, turn several times in fridge before grilling). I marinaded for about 8 hours - making my meats extremely juicy and saturated with flavor.

But why stop with just steak? I decided to marinade some chicken breasts as well, this time with another one of my mother's recipes - what she calls her "shark marinade" (also already posted on our food website). Here is the Shark Marinade recipe:
¼ cup soy sauce
¼ cup orange juice
3 cloves garlic, minced
2 tablespoons olive oil
2 tablespoons lemon juice
1 teaspoon dried oregano
1 teaspoon Worcestershire sauce
½ teaspoon black pepper
½ teaspoon paprika
1 tablespoon chopped dried parsley
Conduct the same process as before with the zip lock bag.

It's official, I can attest to both marinades. The soy and ginger combination complemented the juicy nature of the steak.
The chicken was a stark contrast to the steak, with a tanginess that gave each bite an extra kick.

So what lessons did I learn from my grilling escapade?
#1 If you have a grill, grilling season never ends. Unless you have some tinfoil and a campfire (shoutout to Pat Kaiser), there are not many better ways to cook meat.
#2 Marinading meat for 5+ hours will make your meat incredibly tender, juicy, and downright delicious.
#3 Always listen to your mother...

Sunday, October 9, 2011

Basta Pasta Asparagus. Yes! Finally!! [Rhonda]


Degree of difficulty: OK. Easy, now that I've figured out the sequence
Time: 10 minutes
Serves: 2 to 4

Basta Pasta--this was Anna Kate's suggestion for dinner. In Manhattan, 37 W.17th Street, back in mid-July on a very warm night. A mixed bag of dinner partners: her mom; her friend Matt (our son); Matt and Anna Kate's friend and associate at Ogilvy, Jake; Mike and me.

It's discordant, to say the least, walking into what appears to be yet another Japanese restaurant/sushi bar deal. Seated, we glance at the menu. Wait. What? This is an Italian place? Seriously?

Yes. Seriously. Where they make spaghetti carbonara and toss it in a half wheel of Parmesan Reggiano before serving. You just want to pass out, it's so good.

So Anna Kate and her mom were making appetizer suggestions right and left, and one of the things that landed on the table was an order of asparagi gratinati. Yeah, OK whatever.

Well, it turned out to be one of the hits of the night. It's simple--asparagus al dente, with parmesan crusted on top and a squeeze of lemon. How hard can that be?

For me, way hard. First attempt, roasted the asparagus far beyond al dente. Second time, put the lemon juice on before cooking. No, silly. Asparagus gets mushy. Third time's the charm. Perfecto. The Japanese would be proud.

Basta Pasta's Asparagus
Ingredients:

1 bunch asparagus
1 lemon
1 hunk parmesan reggiano (the real stuff, not the green Kraft can)
1 teaspoon olive oil
Salt to taste


Preheat the oven to 425 F. Wash asparagus, pat dry with paper towel. Toss in small amount olive oil, place on cooking sheet.


Roast on top shelf in oven maybe 8 minutes. Remove. Sprinkle grated parmesan (use the big holes on the grater) and run under the broiler until crusty.

Remove, squeeze lemon and a sprinkle of salt on top.

Suggested soundtrack: John Mayer's "Gravity." Mayer's awesome. Right, Nick?

Saturday, October 8, 2011

Apple Butternut Squash Soup [Rhonda]


Degree of difficulty: medium (peeling the butternut squash takes a little patience)
Time: 20 minutes to prep, 35 minutes to simmer and puree
Serves: 4 to 6

Judging by the typeface and the yellowed paper, I clipped this from a Sunday New York Times Magazine sometime in the early '80s. It's such a perfect soup for autumn, particularly Thanksgiving, with its pretty orangy color and hint of apple. The chopped scallions give it a little kick of green. (You know how I am about garnish! A great garnish, like a sensational pair of shoes, can turn mediocre into magnificent in a hurry. Not that this soup is mediocre. Not by a long shot.)

It freezes well, so a big batch will carry you for a while (or as a starter for a big crowd at the holidays), and it can be made a day or two ahead of the big feast--the flavors develop more fully with an overnight rest in the fridge.

Apple Butternut Squash Soup
Ingredients:

1 tablespoon olive oil, or peanut or canola oil
1 two-pound butternut squash, peeled, seeded and cut into 2-inch pieces
1 McIntosh apple (I used Granny Smith because it's all I had)
1 large onion (or 2 small), peeled and coarsely chopped
1 teaspoon curry powder (I use at least twice that)
3/4 teaspoon ground mace (I usually don't have this on hand. OK, never.)
1/2 teaspoon ground cardamom
1 bay leaf, optional
1/4 cup cider (recipe calls for more but it makes it really sweet)
1 quart homemade chicken stock (I've always used canned stock for this--great results)
1/2 cup half-and-half (or heavy cream--just use less)
Salt to taste
1/4 teaspoon white pepper
1/4 cup finely minced scallions for garnish


Heat oil in large stockpot over medium heat.


Add the squash, apples and onion, stir, saute uncovered for 10 to 15 minutes, or until onion is transparent.


Stir in the mace, curry and cardamom, and bay leaf, if using, and continue cooking until the onion begins to brown.


Add the cider. Bring mixture to a boil over medium-high heat and cook for 3 minutes. Add the stock, lower the heat to medium-low and simmer the mixture for another 35 minutes, or until squash is tender.


Transfer mixture to a food processor bowl and process until soup is smooth, then return to stockpot and reduce by about one-fourth. Stir occasionally.

Stir in the half-and-half, salt and pepper and bring to a simmer. Pour into warmed bowls (I have not trained myself to remember to warm soup bowls, but it's a great idea) and sprinkle the scallions over the top.


Suggested soundtrack: Vivaldi's "Four Seasons: Danza Pastorale (Autumn)"

Easy Appetizer: Fall Phyllo Cups [Zack]


Many people feel a twinge of panic when they are invited to a dinner party and are asked to bring a simple appetizer.  I’m included in this group.  It’s difficult to come up with a creative appetizer that doesn’t take a lot of time to make.  You also don’t want to take over your host's whole kitchen and make a huge mess.  Luckily, almost every grocery store has phyllo cups in their freezer aisle.  You can fill these suckers with anything and bake them, and you will always receive compliments.  And a major upside is that since they are pre-formed, you don’t have to work with the notoriously finicky phyllo sheets yourself.


Process:

Defrost your phyllo cups and pre-heat your oven to 200 C / 400 F.  The temperature isn’t very important – you just want to heat it through and melt the cheese, There is plenty of flexibility on the oven temp if you watch them.

Dice ½ of an onion and place in a frying pan on low heat with a sprinkle of salt and pepper.  Add 1 T of olive oil and cook slowly until caramelized.  Stir every few minutes and add 1 T of water if you think it needs to cook down more without browning first.  It should take about 20 minutes, so you can do other things while they are cooking.  If you are inclined to have the onions sweet, don’t add sugar until they are finished cooking.  You’d be surprised by how sweet they taste when they are a nice golden brown. 

Dice an apple into ¼ inch dice.  Add these to the pan once your onions get pretty close to being finished to soften them up.  Cook for about 5 minutes. 

Take the phyllo cups out and place them on a baking sheet or in a mini-muffin tin.  The mini-muffin pan really helps keep things in place.  Place the apples and onions into the phyllo cup and top with the brie cheese.  You can cover with plastic wrap and finish doing your hair for the party now.

Bake until the cheese is melty in your host’s oven – don’t be picky about the temperature, just toss it in there with whatever else is cooking. 

Top with honey and a few leaves of thyme and serve.


Ingredients:
makes ~24 cups
24 phyllo cups (haha obvi)
1 diced apple any is fine
1 diced onion, caramelized
brie cheese
honey
sprig of thyme

These little cups are perfect vehicles for your creativity:

  • goat cheese, bacon, peaches or pears
  • minced steak, red onions, parmesan cheese
  • ground beef, taco seasoning, hot sauce, queso fresco
  • pesto, chicken, buffalo motz
  • diced shrimp, bacon, bbq sauce, cheddar cheese
  • scallops, curry powder, cream cheese, chives
  • etc.
Song to jam to - Jamiroquai – Spend a Lifetime (this will relax you!)

Tuesday, October 4, 2011

Apple Crisp [Rhonda]


Degree of difficulty: super easy
Time: 10 minutes to prep, 40 minutes to bake
Serves: 6

Bounding off the steps of the kindergarten bus, backpack bobbing, his right hand gripping a clutch of paper, Zack ran up the gravel driveway to show me. "Mom! Mom! Look! Look what we made for you today in Miss Spina's class."

It was a recipe book, stapled at the edge, with Xeroxed favorites from somebody's kitchen, things I'd probably never make: zucchini bread with whole wheat flour, ants on a log (the peanut butter/celery/raisin combo). But Apple Crisp sounded decent. And Zack was so excited...the whole class had one of these!

Wouldn't you know? It turned out to be the easiest dessert ever, delicious with a scoop of French vanilla ice cream, an ode to fall and cooler days. And for those who suffer gravely from pie crust-aphobia, you're good. No rolling out anything, trimming, shaping, giving up.

Apple Crisp
Ingredients:

6 MacIntosh apples, peeled and sliced into chunks
2 teaspoons cinnamon (or more if you like it jazzy)
2 teaspoons ground cloves
1/2 teaspoon salt
1/2 cup sugar
3/4 cup flour
1/3 cup butter

Spread apple chunks in bottom of 8x8x2 pan. Sprinkle cinnamon, cloves and salt over the apple. Stir to mix.

Mix sugar, flour and butter together with pastry cutter. (Oh Miss Spina, we all use our fingers!)

Spread over apples.

Bake 40 minutes in a 350 F oven.

Serve with a scoop of vanilla ice cream or a little heavy cream whipped with a couple tablespoons cognac.

Suggested soundtrack: Debussy's "The Children's Corner," #1: Doctor Gradus Ad Parnassum

Braised Rabbit with Wild Chestnuts [Zack]

While out on a run in a park in Middleheim, I kept seeing people scramble into the woods with plastic shopping bags or hippie satchels.  After my 4th lap, I decided to jump into the woods and figure out what everyone was harvesting.  It turns out chestnuts were falling all over the place, so as a cool-down, I picked up as many as my shirt could carry.

Because I was pretending to be a hardcore mountain man, I figured rabbit would be a great thing to accompany the roasted chestnuts.  But instead of trapping the bunnies and killing them myself, I got them already prepared from the grocery store.

Below seems like an ambitious recipe (especially since I can't remember ever having rabbit before and have therefore obviously never cooked it).  Honestly, it's way easier than you think - if you've ever braised anything - beef, chicken, lamb, etc. you will know how to braise the rabbit.  And the rabbit cooks and tastes similar to chicken thighs, with loads of flavor.

This is a great winter dish and it makes you feel like a woodsman (or woodswoman).


Process:

Pre-heat your oven to 250 F / 125 C.  Heat up a large oven-proof pot with a lid to medium heat and add 2 T oil and 2 T butter once the pan is hot.  Put in your diced pancetta and cook for 1 minute.  Brown the rabbit pieces in the oil, being careful not to over-crowd your pan.  If you add too much meat at once, you may as well just skip the step because you will not get the proper maillard reaction.  Once the first batch is caramelized nicely, remove to a plate and repeat until you are finished with your rabbit.


In the same fat (you can pour out a bit if you think it’s too much), add the potatoes, onions, carrots, mushrooms, garlic, and thyme.  Once you feel like they have had some love from the pan, de-glaze with your wine and port.  Add in the chicken stock, dijon mustard, 1 T of vinegar, and a bit more water to cover the top of the contents.  The below chunks in the picture are frozen bits of my chicken stock.


In a side bowl, thoroughly mix  3 T of port with 3 T of flour.  It will look like blueberry yogurt. 


The flour will thicken up your sauce, and adding it to port before trying to stir it in ensures that you don’t have any flour lumps (re lumps: think under mixed Swiss-Miss hot chocolate, but with flour.  Not that fun).  Stir in the thickener and let the contents come to a simmer.  Put the lid on and place in your oven.  Let this go for about 1.5 hours and go shovel some snow.


Or, if you somehow found free unroasted chestnuts on the ground, you have to do a bit more work.  Start with the flat side of the chestnut and make an "X" in the middle of it about 1/4 an inch deep.


The chestnuts can go in the same oven as the braise for about 20 minutes.  When they come out and look toasty, cover them with a kitchen towel for 10 minutes so they soften up a bit.  They are kind of a pain in the butt to peal, but if you let them get cold, it gets much tougher.  Take off the outer shell and the 2nd skin.  If they crumble like a lot of ours did, you can add the crumbs anyways as it adds to the "rustic nature" of this meal.


Check on the rabbit by pricking the leg with a knife.  If it slides right in, it’s finished.


The recipe can go in 2 ways now – you can have rabbit stew if you leave the sauce un-reduced, or you can choose to take everything out of the pot and cook the sauce down until it has a thicker consistency.


Once your sauce coats the back of a spoon and is to your liking (it took me 15 minutes on med-low), add everything back into the pot, plus your roasted chestnuts and serve!


Ingredients:

1 1/2 rabbits, quartered
3 slices of diced pancetta
4-5 quartered red potatoes
4 small quartered red onions
2 chopped carrots
10 sliced oyster mushrooms
5 sliced baby bella mushrooms
4 cloves garlic, sliced
a few sprigs of thyme
roasted chestnuts (or walnuts are fine)

1 1/2 glasses of red wine
2 glasses of port
1 cup chicken stock
3 T flour
1 T dijon
1 T red wine vinegar

Jam to this - Beatles:  She’s so heavy

Thursday, September 29, 2011

Pressure Cooker Chicken Stock [Zack]

Chicken stock is a really special thing to make in the kitchen.  It costs you next to no money to make, but once you have it on hand, it feels as precious as gold.  I never would have imagined that I would become "stingy" with such an inexpensive ingredient, carefully apportioning and rationing the stock to each dish I make - it's not like it's black truffle.

Something funny occurred to me while writing this post: in the past very poor people used to use the carcasses of their chickens to stretch out their food and stay alive.  They would make stews to squeeze out the last nutrients from the animals they had raised.  These days, it's used as a flavor booster or a sauce enhancer in the fanciest of restaurants.  It seems like the "from scratch" cooking went from being necessary and entirely common, to a rare luxury.

Personally, one reason I love this ingredient because I got to (finally) teach my mom something in the kitchen.  I learned most of my cooking growing up in the family kitchen, doing small tasks and observing.  But making chicken stock as part of my cooking routine is something that I got to share with my mom.  Each time we talked, I would go on and on about how great making stock was, but she had a bad experience when she started cooking it.  I finally convinced her to make the stock again, and now we talk about different ways to use the stock in almost every conversation we have.

I've been experimenting with my pressure cooker because it seems to greatly speed up cooking times.  I looked online and using a pressure cooker didn't seem like a very popular method to make stock, so naturally I gave it a shot.  It amazed me that this method produced a really deep and dark stock in 1/3 of the time.  If you don't have a pressure cooker, just simmer the whole shebang for 3 hours, then strain.  Michael Ruhlman also has thought up a really creative shortcut to making a carefree stock that I will post on later.


Process:

Gather all of the bones and whatever is left over from your roasted chicken.  You can either save the bones in the freezer like I do, or you can make the stock right after dinner.


Place them in your pressure cooker and add the carrots, celery, garlic, black peppercorns, and onions.


Pour water over the bones, put the pressure cooker on high heat to let it come to an easy boil.  Let it go for 5 minutes and then skim off any funky looking foam and fat.  You can do this by dipping the edge of the spoon against the side of the pot.  To make it even easier, you can move the pot so only one corner is over the heat source.  All of the undesirables will appear on the opposite side of the pot.


(Notice that I have a mix of raw and cooked chicken parts - I had saved the backbones from my spatchcocked chickens.  If you use all unroasted bones, it's called a white stock.  I suggest using whatever you have on hand.)

Place the lid of the pressure cooker on and make sure it seals.  Add the pressure regulator cap and turn the heat down to medium-low.  Let it hiss for 45 minutes and then take it off the heat.  Let the pressure reduce naturally (should take about 15 minutes).


Make sure the cooker is de-pressurized before you open the lid.  The stock should smell like an intense chicken noodle soup.


Pick out the big bones and veggies with tongs and then strain the stock into another pot.  Rinse your pressure cooker and then strain the stock back into it.  For the second strain, you can use cheesecloth in the strainer if you have some, but my fine mesh strainer works well enough for me.

Reduce the stock down until it’s concentrated.  I suggest not adding any salt since you don’t know how you are going to use the ingredient in the future.  Unless you are using it within a few days and want to keep it in the fridge, you can freeze it in a few ways.  My mom loves freezing it in ice cube trays and then keeping the cubes in the freezer in ziplock bags.  I just pour the finished product into jars and place them in the freezer.  Don’t overfill the jars with the stock – the liquid will expand when you freeze it.


If you let it defrost after a few hours it will become just like Jell-o (because of the collagen in the bones) and the fat will solidify on the top.  This makes it easier to remove the fat – just scrape it off with a spoon. 

Ingredients:

Roasted bones of 2 chicken carcasses
1 medium onion
1 large carrot
1 stick celery
Small handful of black peppercorns
Water to cover the bones

Hopefully all of that rambling convinced you to try to make stock.  It's almost free and I can gaurentee it will elevate your cooking game.  It makes amazing soups, great fancy French sauces, and adds depth so you can swap out some of the heavy cream required for sauces.  Plus it's totally badass when you can say you made a soup totally from scratch.

Song to jam to:  George Michael - Careless Whisper