Tuesday, May 29, 2012
World's Easiest Summer Lunch [Rhonda]
World's Easiest Summer Lunch
Degree of difficulty: what did I just say? Easiest!
Time: 5 minutes, if.
Serves: one very hungry dancer or two politely sharing.
Columbus was enjoying almost-record heat, and after going hard for an hour-plus at a Michael Nicholson hip hop event in a large gym with 150 sweaty others, no AC, no fans, I came back home obviously hot, but famished, needing something filling but cool, and right now. And maybe mayonnaise wouldn't immediately spring to mind, but when you mix it with two ingredients and gently coat cooled steamed shrimp or (splurge!) crab meat, it makes one amazing summer salad.
Magic Mayo:
1 big dollop any brand real mayo
1 small splash ponzu
1 slightly bigger splash good soy sauce (I like Yamasa brand)
Mix and serve, baby, mix and serve.
Suggested soundtrack: Big Sean's "Early in the Morning" (not responsible for the content of this message)
Degree of difficulty: what did I just say? Easiest!
Time: 5 minutes, if.
Serves: one very hungry dancer or two politely sharing.
Columbus was enjoying almost-record heat, and after going hard for an hour-plus at a Michael Nicholson hip hop event in a large gym with 150 sweaty others, no AC, no fans, I came back home obviously hot, but famished, needing something filling but cool, and right now. And maybe mayonnaise wouldn't immediately spring to mind, but when you mix it with two ingredients and gently coat cooled steamed shrimp or (splurge!) crab meat, it makes one amazing summer salad.
Magic Mayo:
1 big dollop any brand real mayo
1 small splash ponzu
1 slightly bigger splash good soy sauce (I like Yamasa brand)
Mix and serve, baby, mix and serve.
Suggested soundtrack: Big Sean's "Early in the Morning" (not responsible for the content of this message)
Saturday, May 19, 2012
White Asparagus, Spinach, Pancetta, and a Poached Egg [Zack]
White asparagus is in season in Belgium and it's invading menus everywhere. It's for good reason - it's really delicious!
I've been fantasizing about making this dish for a few weeks. I figured the combination of the savory white asparagus along with some sauteed spinach would play really nicely when they are topped with some croutons, crisped prosciutto, and a (hopefully) perfectly poached egg.
This is a great dinner to have if you are sick of eating big slabs of meat, but don't want to quit cold-turkey for a meal. And plus, I think you'll enjoy the interplay of this veggie-centered meal. If you like your poached egg with a runny center, it will add a great creamy quality to the dish - you can save the hollandaise for a special occasion :)
Process:
We are going to cook the prosciutto and the croutons first since they don't need to be hot when the dish is served.
First, put prosciutto into a cold frying pan with 1 tsp of olive oil and turn the heat on to medium. It will slowly render down the prosciutto and will crisp it after about 8 minutes. Just watch it and flip it when needed.
Cube your bread as large as you like croutons. Add 1 T of garlic butter (or regular) and 2T of olive oil to a pan on med-low heat. Let the butter melt and swirl it around until it coats the bottom of the pan.
Toss the croutons in the butter to evenly coat them.
Add in your dried oregano, onion powder, and salt. Continue to toss every minute or so to ensure that all sides are being browned evenly. If you think it looks too dry, you can always drizzle a bit more olive oil on top.
Transfer both your prosciutto and croutons on a separate plate to await the final step of putting everything together.
Get a large pot of water boiling for your poached egg.
Since white asparagus is thicker than normal asparagus, you should peel off the outer layer. It tends to get woody otherwise. Peel it just like you would a carrot and cut off the bottom 1-2 inches of the stem as well.
Add this to a medium-low pan with a 1T of olive oil. Toss for a few minutes in the oil. Add the shallots and then cook for another minute.
Toss in your handfuls of spinach and cook for another 3 minutes. Take off of the heat until you are ready to serve. It should still be hot as long as you don't screw around with the eggs too long.
Back the heat off a bit on your boiling water so it comes back down to a simmer. Crack each egg into a bowl. Swirl the water around so it looks like a typhoon and drop the egg gently right into the middle. The encircling water will fold the whites over the yolk so you have one solid poached egg!
After 3 to 3.5 minutes, extract the poached egg and plate the whole dish. Serve with an appropriate Belgian beer. Here, I had a Golden Carouls Classic.
Ingredients:
8 white asparagus spears
3 large handfuls of spinach
1 shallot
2 eggs, poached
4 slices crisped prosciutto
3-5 pieces old bread
1 T garlic butter (or regular butter)
2-4 T olive oil (depending on how thirsty your bread is)
1 tsp oregano
1 tsp onion powder
Song: Selah Sue - Crazy Vibes (great Belgian singer!)
I've been fantasizing about making this dish for a few weeks. I figured the combination of the savory white asparagus along with some sauteed spinach would play really nicely when they are topped with some croutons, crisped prosciutto, and a (hopefully) perfectly poached egg.
This is a great dinner to have if you are sick of eating big slabs of meat, but don't want to quit cold-turkey for a meal. And plus, I think you'll enjoy the interplay of this veggie-centered meal. If you like your poached egg with a runny center, it will add a great creamy quality to the dish - you can save the hollandaise for a special occasion :)
Process:
We are going to cook the prosciutto and the croutons first since they don't need to be hot when the dish is served.
First, put prosciutto into a cold frying pan with 1 tsp of olive oil and turn the heat on to medium. It will slowly render down the prosciutto and will crisp it after about 8 minutes. Just watch it and flip it when needed.
Cube your bread as large as you like croutons. Add 1 T of garlic butter (or regular) and 2T of olive oil to a pan on med-low heat. Let the butter melt and swirl it around until it coats the bottom of the pan.
Toss the croutons in the butter to evenly coat them.
Add in your dried oregano, onion powder, and salt. Continue to toss every minute or so to ensure that all sides are being browned evenly. If you think it looks too dry, you can always drizzle a bit more olive oil on top.
Transfer both your prosciutto and croutons on a separate plate to await the final step of putting everything together.
Get a large pot of water boiling for your poached egg.
Since white asparagus is thicker than normal asparagus, you should peel off the outer layer. It tends to get woody otherwise. Peel it just like you would a carrot and cut off the bottom 1-2 inches of the stem as well.
Add this to a medium-low pan with a 1T of olive oil. Toss for a few minutes in the oil. Add the shallots and then cook for another minute.
Toss in your handfuls of spinach and cook for another 3 minutes. Take off of the heat until you are ready to serve. It should still be hot as long as you don't screw around with the eggs too long.
Back the heat off a bit on your boiling water so it comes back down to a simmer. Crack each egg into a bowl. Swirl the water around so it looks like a typhoon and drop the egg gently right into the middle. The encircling water will fold the whites over the yolk so you have one solid poached egg!
After 3 to 3.5 minutes, extract the poached egg and plate the whole dish. Serve with an appropriate Belgian beer. Here, I had a Golden Carouls Classic.
Ingredients:
8 white asparagus spears
3 large handfuls of spinach
1 shallot
2 eggs, poached
4 slices crisped prosciutto
3-5 pieces old bread
1 T garlic butter (or regular butter)
2-4 T olive oil (depending on how thirsty your bread is)
1 tsp oregano
1 tsp onion powder
Song: Selah Sue - Crazy Vibes (great Belgian singer!)
Thursday, May 17, 2012
Limited Kitchen – Simple Citrus Salad [Matt]
Citrus salad is a bit of an over-promise only because it implies that you would do something strange, like put some sort of fruit in your salad. Leave that for the jello.
Ingredients:
- lean mean chicken breasts (organic and as free of constraint as possible, pay the extra 2 bucks) - mixed green salad
- a few lemons (i'm sure you'll make this more than once with all that free-range chicken that I got you to buy)
- croutons
- parmesan reggiano
- olive oil / balsamic (or apple cider vinegar if that suites your style better, but if you do that add a splash of spicy mustard. variations can be riveting)
- avocado, tomato, and olives can all be great additions depending on your tastes
The night before:
Preheat the oven to 'hot enough to cook your chicken.' While your oven heats, take the chicken breasts out of container. Wash under warm water. Blot with a paper towel. Trim off any fat or unsightly bits. Grab a few of your favorite spices. Toss them on the breasts. Have fun with it. Throw the spiced breasts on a lightly oiled baking sheet. Put them in the oven and let them cook through.
When done, let them cool and then cut them into 4 - 6 oz servings pending your future-immanent lunchtime hunger. Stick the baggies of cooked chicken in the fridge.
The big day of:
Morning prep - wash the salad. Drizzle the olive oil and balsamic into a small container. Here's the most exciting part... now cut the lemon. Squeeze it into the dressing mixture. What just happened there will change your salad from being standard, boring, chicken on a salad into a zesty smile-fest.
The under-taxing prep continues when you grate cheese into a baggie and place croutons in another (to cut down on baggie consumption Ziplock has created a 3-section salad container that is pretty great). So now you should be good to leave your abode with your bagged chicken, mixed greens, dressing, croutons (only a few, otherwise it kinda kills the point of a salad), and grated parmesan.
In your work kitchen:
Grab a large bowl (or I guess bring one if your work place is really cheap) and place chicken inside. Use a fork and knife to cut the chicken breast into bite size portions (saves work later and potential stains on your pants). Place the cut chicken in the microwave for about 45 seconds. Remove chicken from microwave and add your baggie of dressing (this helps cool the chicken to room temp so it doesn't wilt your lettuce on contact).
Drop in your greens. Throw in your croutons. Sprinkle that cheese. Use your fork and knife as mixing tools.
Now eat your zesty, healthy, salad that tastes like fun instead of sadness.
- lean mean chicken breasts (organic and as free of constraint as possible, pay the extra 2 bucks) - mixed green salad
- a few lemons (i'm sure you'll make this more than once with all that free-range chicken that I got you to buy)
- croutons
- parmesan reggiano
- olive oil / balsamic (or apple cider vinegar if that suites your style better, but if you do that add a splash of spicy mustard. variations can be riveting)
- avocado, tomato, and olives can all be great additions depending on your tastes
The night before:
Preheat the oven to 'hot enough to cook your chicken.' While your oven heats, take the chicken breasts out of container. Wash under warm water. Blot with a paper towel. Trim off any fat or unsightly bits. Grab a few of your favorite spices. Toss them on the breasts. Have fun with it. Throw the spiced breasts on a lightly oiled baking sheet. Put them in the oven and let them cook through.
When done, let them cool and then cut them into 4 - 6 oz servings pending your future-immanent lunchtime hunger. Stick the baggies of cooked chicken in the fridge.
The big day of:
Morning prep - wash the salad. Drizzle the olive oil and balsamic into a small container. Here's the most exciting part... now cut the lemon. Squeeze it into the dressing mixture. What just happened there will change your salad from being standard, boring, chicken on a salad into a zesty smile-fest.
The under-taxing prep continues when you grate cheese into a baggie and place croutons in another (to cut down on baggie consumption Ziplock has created a 3-section salad container that is pretty great). So now you should be good to leave your abode with your bagged chicken, mixed greens, dressing, croutons (only a few, otherwise it kinda kills the point of a salad), and grated parmesan.
In your work kitchen:
Grab a large bowl (or I guess bring one if your work place is really cheap) and place chicken inside. Use a fork and knife to cut the chicken breast into bite size portions (saves work later and potential stains on your pants). Place the cut chicken in the microwave for about 45 seconds. Remove chicken from microwave and add your baggie of dressing (this helps cool the chicken to room temp so it doesn't wilt your lettuce on contact).
Drop in your greens. Throw in your croutons. Sprinkle that cheese. Use your fork and knife as mixing tools.
Now eat your zesty, healthy, salad that tastes like fun instead of sadness.
Wednesday, May 16, 2012
Stuffed French Toast (Tom)
Emeral was a no-show on Mother’s Day. So I took it upon
myself to make my kid's Mom a special breakfast served in bed.
For 2 servings you will need:
-
1 French Baguette sliced in rounds Your baker can slice
it for you.
-
4 oz. Cream Cheese. Whipped or the soft spreading kind
-
4 oz. Cherry Preserves
-
1 oz. Butter
-
1 Egg
-
¼ Cup Milk
-
2 Drops Vanilla Extract
-
Cherry or Raspberry Syrup. At room temperature.You can
find this in a specialty shop or your grocer will carry Smucker’s brand.
-
Bacon or Ham is optional
Beat egg, milk and vanilla in a large bowl. Heat a frying
pan to medium heat. Add the butter to the pan. Spoon one side of 4 rounds with
the cream cheese. Then spoon one side of 4 rounds with the cherry preserves.
Put together like a sandwich and place them in the egg wash mixture in the
bowl. Coat all sides generously. Remove and place the toast in the melted
butter pan. Cook one side for approximately 1 ½ minutes then flip over cooking
the other side for about the same time. Both sides should be golden brown.
Serve on a plate. Pour some sauce over the toast and enjoy.
Saturday, May 12, 2012
Homemade Beef Jerky [Zack]
Sometimes people are adventurous with their food. Rarely is your food more adventurous than you are. I'm proud (and/or jealous) to say that my first batch of homemade beef jerky has traveled to the top of the world. Here it is at the summit of Aconcagua, Argentina - the highest peak in the Southern and Western Hemisphere at 6,962m.
Our good friends John and Martina decided to ditch out on corporate life and take a 7 month hiatus to backpack around the world, climbing the tallest mountains on many different continents. Even though we were sick with envy, Lauren and I wanted to get them a proper going away present. But what do you get people who just sold all of their life-long possessions at a flea market for 1 EUR a piece??
Beef jerky was our answer. It's great for hikers - the weight to protein ratio is amazing and it gives a much-needed boost of salt. It would also remind them of us because it's very American - imagine a cowboy sitting under a tree in the shade, hat tipped low, gnawing on a piece of beef jerky. Cowboys had it figured out - if they let strips of beef dry in the sun, they would became much lighter to carry and wouldn't spoil.
I was surprised at how great homemade beef jerky tasted and how simple it was to make. In summary, you pour all of the ingredients into a bag, let the meat marinate for 1 day, then put it in a low-heat oven to dry it out until it feels like beef jerky.
It's preferable to use a cheap cut of meat because any fat creates a chance for it to spoil. Save the rib-eyes for the grill!
Process:
Below a picture of the necessary ingredients:
Trim any fat off of your beef. Place it into the freezer so it firms up. It’s a lot easier to slice the meat evenly if you put it in the freezer for about an hour. It’s important to try to maintain the same thickness for all of the slices of beef because you want even drying.
Dice or chop your ginger, garlic, onion, and chiles. Place them in a large zip-lock bag. Measure out your soy sauce, vinegar, honey, sesame oil, and brown sugar. Stir to mix and pour it into the bag.
Take your steak out of the freezer and make sure it’s firm to the touch, but not a solid brick (or else you won't be able to slice it). Slice each piece ~1/8 inch thick and place into the marinade bag.
When you are finished, squeeze out as much air in the bag as possible and massage the marinade around the meat. Refrigerate for 1 day.
Take the meat out of the bag and drain off the marinade. Place the meat on a grated oven rack, leaving a little space around each piece. I put a tray below it to catch the marinade that drips off during the drying process.
Put into the oven at 150 F / 75 C for 3-4 hours. The time really depends on the thickness of your slices. If you've ever had beef jerky before, just take it out when it feels like the stuff you get out of the package. The low temperature will dry out the beef strips and you’ll be left with jerky in a few hours!
Bag it up for your hiker friends, or place it in a covered container. It should last for a few weeks, but it's doubtful that it will make it through the first evening.
Ingredients:
1/2 inch ginger
3 cloves garlic
2 birdseye chiles
1/2 red onion
3/4 cup light soy sauce (or 1/2 cup regular)
2T rice wine vinegar
1/2 T sesame oil
4 T honey
2T brown sugar
2 lb steak (900g)
Creativity Options:
Add lemongrass and cilantro to the marinade for a Thai feel
Smoky paprika will give a nice deep flavor
Tons of freshly cracked pepper is a great variation
Song: Robin Thicke - Compass or Map
Our good friends John and Martina decided to ditch out on corporate life and take a 7 month hiatus to backpack around the world, climbing the tallest mountains on many different continents. Even though we were sick with envy, Lauren and I wanted to get them a proper going away present. But what do you get people who just sold all of their life-long possessions at a flea market for 1 EUR a piece??
Beef jerky was our answer. It's great for hikers - the weight to protein ratio is amazing and it gives a much-needed boost of salt. It would also remind them of us because it's very American - imagine a cowboy sitting under a tree in the shade, hat tipped low, gnawing on a piece of beef jerky. Cowboys had it figured out - if they let strips of beef dry in the sun, they would became much lighter to carry and wouldn't spoil.
I was surprised at how great homemade beef jerky tasted and how simple it was to make. In summary, you pour all of the ingredients into a bag, let the meat marinate for 1 day, then put it in a low-heat oven to dry it out until it feels like beef jerky.
It's preferable to use a cheap cut of meat because any fat creates a chance for it to spoil. Save the rib-eyes for the grill!
Process:
Below a picture of the necessary ingredients:
Trim any fat off of your beef. Place it into the freezer so it firms up. It’s a lot easier to slice the meat evenly if you put it in the freezer for about an hour. It’s important to try to maintain the same thickness for all of the slices of beef because you want even drying.
Dice or chop your ginger, garlic, onion, and chiles. Place them in a large zip-lock bag. Measure out your soy sauce, vinegar, honey, sesame oil, and brown sugar. Stir to mix and pour it into the bag.
Take your steak out of the freezer and make sure it’s firm to the touch, but not a solid brick (or else you won't be able to slice it). Slice each piece ~1/8 inch thick and place into the marinade bag.
When you are finished, squeeze out as much air in the bag as possible and massage the marinade around the meat. Refrigerate for 1 day.
Take the meat out of the bag and drain off the marinade. Place the meat on a grated oven rack, leaving a little space around each piece. I put a tray below it to catch the marinade that drips off during the drying process.
Put into the oven at 150 F / 75 C for 3-4 hours. The time really depends on the thickness of your slices. If you've ever had beef jerky before, just take it out when it feels like the stuff you get out of the package. The low temperature will dry out the beef strips and you’ll be left with jerky in a few hours!
Bag it up for your hiker friends, or place it in a covered container. It should last for a few weeks, but it's doubtful that it will make it through the first evening.
Ingredients:
1/2 inch ginger
3 cloves garlic
2 birdseye chiles
1/2 red onion
3/4 cup light soy sauce (or 1/2 cup regular)
2T rice wine vinegar
1/2 T sesame oil
4 T honey
2T brown sugar
2 lb steak (900g)
Creativity Options:
Add lemongrass and cilantro to the marinade for a Thai feel
Smoky paprika will give a nice deep flavor
Tons of freshly cracked pepper is a great variation
Song: Robin Thicke - Compass or Map
Tuesday, May 8, 2012
Grilled Chicken Breasts with Apricot Jam Marinade [Rhonda]
Degree of difficulty: easy
Time: 10 minutes to make the marinade, 20 minutes to heat grill and cook
Serves: 2 to 4
Fire up your grill for a super-easy chicken breast with an apricot jam marinade(nice for a pork tenderloin or pork chop). Make a huge batch and freeze the leftovers in small containers for another night. Great in salads or creative paninis.
Apricot Jammin’ on the Grill Ingredients:
½ cup apricot jam
2 tablespoons soy sauce
Apricot Jammin’ on the Grill Ingredients:
½ cup apricot jam
2 tablespoons soy sauce
2 tablespoons dry white wine
2 tablespoons minced scallions
2 tablespoons minced garlic
2 tablespoons minced fresh ginger
2 tablespoons fresh lemon juice
Salt and pepper to taste
Boneless chicken breasts (3 or so, sliced in half to be thinner cutlets)
Combine all ingredients except chicken breasts in bowl. Mix well. Rinse the chicken breasts, pat dry, slice in half longways to make a thinner cutlet. Put chicken breasts in marinade, refrigerate, and marinate for at least 4 hours.
Grill over hot coals. The chicken is thin, so it won’t take long.
Friday, April 27, 2012
Homemade Cured Bacon 4 Ways [Zack]
My friends Steve, Pete, Mike, and Adam are holding their own "Beer and Bacon" festival in Boston this weekend since they were not able to get in the official one. Something tells me the party that they are throwing will be better/more intense/funnier....
Since I live across the ocean from them and can't attend, I'm jealous. The only way I can combat their skype-taunting session is to throw something equally fun back in their faces. One thing that could possibly make them jealous is to cure my own bacon (4 different ways) and drink some Belgian beers.
I first got the idea to start curing my own bacon when I purchased Michael Ruhlman's book Charcuterie. I've always been interested in how food was produced before big companies took over and started processing food. Bacon is one of the most simple cures to try, and it happens to be one of my favorite foods, so it was a no-brainer. I have made many iterations of cures and have found experimenting with different seasonings methods to be really rewarding.
Knowledge bomb: The curing process goes back until ancient times as a way to preserve meat (way before fridges existed). When you salt a piece of meat, the salt pulls the water out of the meat through a process called osmosis. After curing your bacon, you will notice there is a lot of liquid in the bag. Thanks, salt! I have no idea how this works scientifically, but the end result is to flavor the meat, slow the oxidation process, and make it a tough place for bacteria to grow. Boom.
There has been a bacon craze on the internet for the past 3-5 years. This heavenly meat certainly deserves all of the accolades it has been receiving. I know this post is late to the party, so I figured I could add a bit of flair by doing 4 different renditions of dry cures.
Process:
How to cure bacon:
Curing is similar baking - you have to have the right proportions of salt and seasoning to meat, or else you will end up with a bad end product. The process is the same for all of the below cures - you just need to cure it, smoke it, slice it, and then cook it!
Get a nice pork belly from your local butcher shop. Mine was 5 pounds, and skin-on is okay. If you would like to try the 4 different types of cures, section your pork belly into the appropriate weights. If not, just choose your favorite and leave the belly whole.
Weigh out and measure your ingredients. The most important thing to get right is the proportion of salt (pink and kosher) to the weight of the pork belly. I have also provided measurements in the recipe in case you don't have a scale.
Place each of the different pork bellies into an individual zip-lock bag, pour the dry cure in, and mix it around so the cure contacts all sides of the meat. Squeeze out all of the air from the bag and seal it. Place the bags into baking dish in case the liquid drips in your fridge (that's a gross mess to clean up). You'll want to flip the bellies every day or two in order to make sure the meat is curing evenly.
Curing time depends on the thickness of the belly. For me, it took 1 week.
To test to see whether it's finished, press on the belly and it should feel firm like a well-done steak.
How to smoke/grill cured pork belly:
Take the bellies out of the bags, wipe off the cure, and place them onto a pre-heated grill to 250F. You'll want to use indirect heat to slowly smoke the bacon. Turn on one burner at one end of the grill, and place your bellies on the other side. Or if you have charcoal or wood chips, pile them all on one side of the grill.
After an hour or 2, take the bacon off of the grill and remove the skin if it's still attached.
Congratulations! You have just made bacon! I bet it tastes way better than the store-bought stuff. You can either freeze it whole, refrigerate it, or get to cooking it right away. I'm guessing it won't last very long in your house - even if you live alone....
How to properly cook bacon in a frying pan:
Slice the bacon in even thickness. Since you worked hard to make this, you can slice it as thick as you want! You'll need a sharp knife. If it's still difficult, you can put the bacon in the freezer for about 45 minutes to make it more firm.
Since I live across the ocean from them and can't attend, I'm jealous. The only way I can combat their skype-taunting session is to throw something equally fun back in their faces. One thing that could possibly make them jealous is to cure my own bacon (4 different ways) and drink some Belgian beers.
I first got the idea to start curing my own bacon when I purchased Michael Ruhlman's book Charcuterie. I've always been interested in how food was produced before big companies took over and started processing food. Bacon is one of the most simple cures to try, and it happens to be one of my favorite foods, so it was a no-brainer. I have made many iterations of cures and have found experimenting with different seasonings methods to be really rewarding.
Knowledge bomb: The curing process goes back until ancient times as a way to preserve meat (way before fridges existed). When you salt a piece of meat, the salt pulls the water out of the meat through a process called osmosis. After curing your bacon, you will notice there is a lot of liquid in the bag. Thanks, salt! I have no idea how this works scientifically, but the end result is to flavor the meat, slow the oxidation process, and make it a tough place for bacteria to grow. Boom.
There has been a bacon craze on the internet for the past 3-5 years. This heavenly meat certainly deserves all of the accolades it has been receiving. I know this post is late to the party, so I figured I could add a bit of flair by doing 4 different renditions of dry cures.
Taste test results are at the end of the post.
Process:
How to cure bacon:
Curing is similar baking - you have to have the right proportions of salt and seasoning to meat, or else you will end up with a bad end product. The process is the same for all of the below cures - you just need to cure it, smoke it, slice it, and then cook it!
Get a nice pork belly from your local butcher shop. Mine was 5 pounds, and skin-on is okay. If you would like to try the 4 different types of cures, section your pork belly into the appropriate weights. If not, just choose your favorite and leave the belly whole.
Weigh out and measure your ingredients. The most important thing to get right is the proportion of salt (pink and kosher) to the weight of the pork belly. I have also provided measurements in the recipe in case you don't have a scale.
Place each of the different pork bellies into an individual zip-lock bag, pour the dry cure in, and mix it around so the cure contacts all sides of the meat. Squeeze out all of the air from the bag and seal it. Place the bags into baking dish in case the liquid drips in your fridge (that's a gross mess to clean up). You'll want to flip the bellies every day or two in order to make sure the meat is curing evenly.
Curing time depends on the thickness of the belly. For me, it took 1 week.
To test to see whether it's finished, press on the belly and it should feel firm like a well-done steak.
How to smoke/grill cured pork belly:
Take the bellies out of the bags, wipe off the cure, and place them onto a pre-heated grill to 250F. You'll want to use indirect heat to slowly smoke the bacon. Turn on one burner at one end of the grill, and place your bellies on the other side. Or if you have charcoal or wood chips, pile them all on one side of the grill.
After an hour or 2, take the bacon off of the grill and remove the skin if it's still attached.
Congratulations! You have just made bacon! I bet it tastes way better than the store-bought stuff. You can either freeze it whole, refrigerate it, or get to cooking it right away. I'm guessing it won't last very long in your house - even if you live alone....
How to properly cook bacon in a frying pan:
Slice the bacon in even thickness. Since you worked hard to make this, you can slice it as thick as you want! You'll need a sharp knife. If it's still difficult, you can put the bacon in the freezer for about 45 minutes to make it more firm.
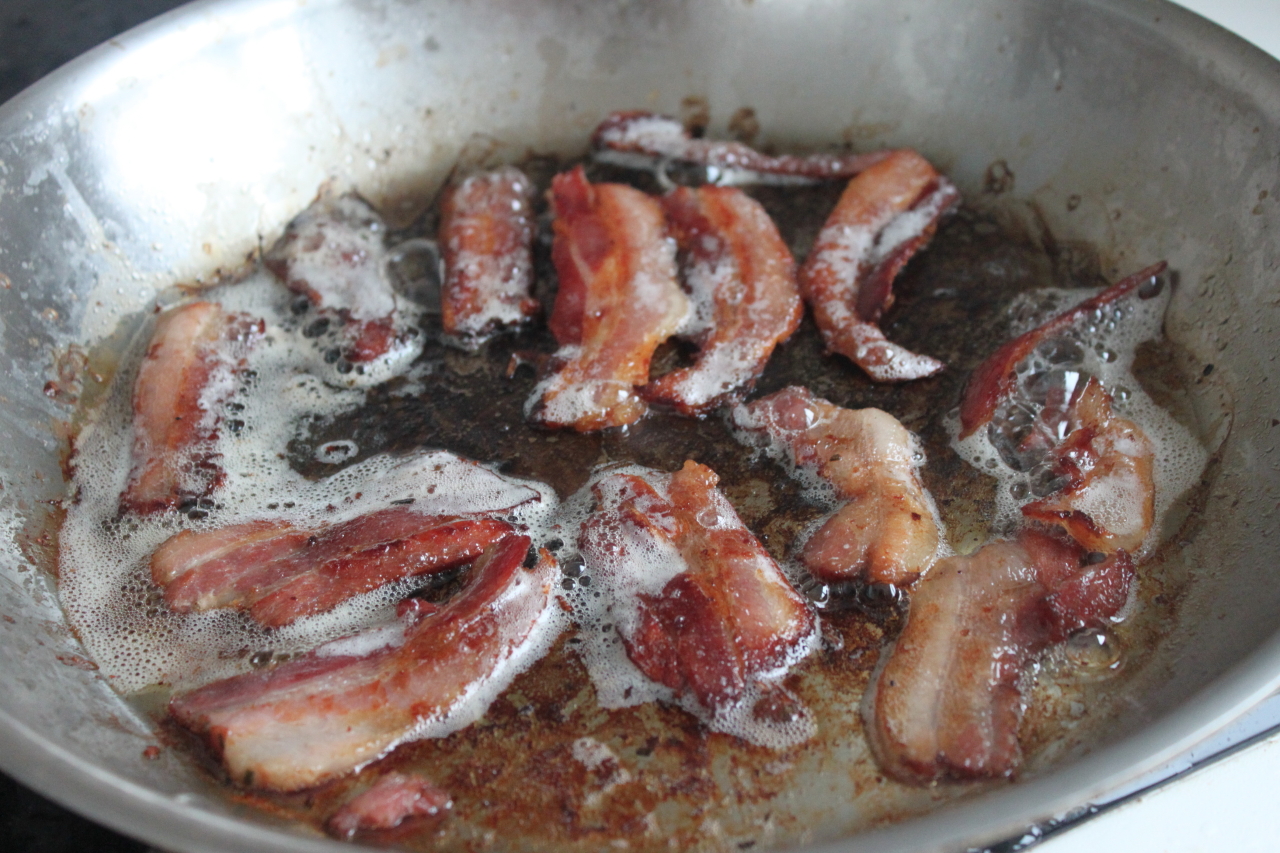
The best way to cook bacon is to start the slices in a cold pan on low heat. If you try to cook it too quickly, you'll end up burning the outside. The cold pan allows the fat to render out of the bacon. Once enough fat has accumulated, it will fry the bacon and produce crispy results. Don't rush it - good things are worth the wait.
Ingredient List for the 4 cures I made:
(All proportions remain constant - if you want to cure a larger piece of belly, do a little math)
Cure #1: The Traditional - Brown Sugar Cure
A no-frills delicious bacon that is very versatile
2.5 lbs pork belly (900g)
1/8 cup kosher salt (25g)
1 tsp pink salt (6g)
1/4 cup brown sugar (50g)
Pre-cure
Post-cure and after smoking
End result
Cure #2: The Asian Sensation - Ginger, Garlic and 5-Spice Cure
A unique blend of Asian flavors that would pair well with duck or Asian-style chicken
2/3 lb pork belly (300g)
2 tsp kosher salt (8g)
1/2 tsp pink salt (2g)
2T brown sugar (20g)
1/2 inch diced ginger
2 cloves minced garlic
1/2 tsp 5 spice
Pre-cure
Post-cure and after smoking
End result
Cure #3: The Smoky BBQ Burger Sidekick - Smoked Paprika and Garlic Cure
Perfect if you don't have a smoker - a flavorful addition to a burger or with eggs in the morning
2/3 lb pork belly (300g)
2 tsp kosher salt (8g)
1/2 tsp pink salt (2g)
2T brown sugar (20g)
1T onion powder
1 tsp smoked paprika
2 cloves minced garlic
Pre-cure
Post-cure and after smoking
End result
Cure #4: The Ole School "Pancetta" - Juniper Berry, Rosemary, and Garlic Cure
A savory cure similar to pancetta - great for pastas like carbonara
2/3 lb pork belly (300g)
2 tsp kosher salt (8g)
1/2 tsp pink salt (2g)
1.5 tsp white sugar (6g)
1 sprig rosemary, chopped
2 cloves minced garlic
8 juniper berries, cracked open to release oils
Pre-cure
Post-cure and after smoking
End result
(All proportions remain constant - if you want to cure a larger piece of belly, do a little math)
Cure #1: The Traditional - Brown Sugar Cure
A no-frills delicious bacon that is very versatile
2.5 lbs pork belly (900g)
1/8 cup kosher salt (25g)
1 tsp pink salt (6g)
1/4 cup brown sugar (50g)
Pre-cure
Post-cure and after smoking
End result
Cure #2: The Asian Sensation - Ginger, Garlic and 5-Spice Cure
A unique blend of Asian flavors that would pair well with duck or Asian-style chicken
2/3 lb pork belly (300g)
2 tsp kosher salt (8g)
1/2 tsp pink salt (2g)
2T brown sugar (20g)
1/2 inch diced ginger
2 cloves minced garlic
1/2 tsp 5 spice
Pre-cure
Post-cure and after smoking
End result
Cure #3: The Smoky BBQ Burger Sidekick - Smoked Paprika and Garlic Cure
Perfect if you don't have a smoker - a flavorful addition to a burger or with eggs in the morning
2/3 lb pork belly (300g)
2 tsp kosher salt (8g)
1/2 tsp pink salt (2g)
2T brown sugar (20g)
1T onion powder
1 tsp smoked paprika
2 cloves minced garlic
Pre-cure
Post-cure and after smoking
End result
Cure #4: The Ole School "Pancetta" - Juniper Berry, Rosemary, and Garlic Cure
A savory cure similar to pancetta - great for pastas like carbonara
2/3 lb pork belly (300g)
2 tsp kosher salt (8g)
1/2 tsp pink salt (2g)
1.5 tsp white sugar (6g)
1 sprig rosemary, chopped
2 cloves minced garlic
8 juniper berries, cracked open to release oils
Pre-cure
Post-cure and after smoking
End result
The Verdict:
Sven - Asian, BBQ, Juniper, Traditional
Lauren - Asian, Juniper, BBQ, Traditional
Zack - Asian, BBQ, Juniper, Traditional
Song: Addicted to Bacon - A Sizzlin Rap Song
p.s. I think I love bacon as much as this kid
Sven - Asian, BBQ, Juniper, Traditional
Lauren - Asian, Juniper, BBQ, Traditional
Zack - Asian, BBQ, Juniper, Traditional
Song: Addicted to Bacon - A Sizzlin Rap Song
p.s. I think I love bacon as much as this kid
Subscribe to:
Posts (Atom)


