Showing posts with label Ingredients. Show all posts

Sunday, September 22, 2013

Gluten-Free Pizza Dough [Matt]

Welcome to the dark side. Don't worry. I won't be sticking around here long either. 


A single parameter was set for pizza night - make the dough gluten-free. I shrugged it off thinking, 'who needs gluten anyway? What absolutely essential role could gluten possibly play in the success or failure of my pizzas?' Dumb.

I started researching gluten-free doughs and sifted through about 10 different recipes. I narrowed it down by comparing common ingredients (some recipes wanted you to buy four different flours (that I'd never use again. sweet, bro)). 

Basically it comes down to needing GF All-Purpose Flour and Xanthan Gum (which apparently only Whole Foods sells). The Xanthan Gum acts as the key bonding agent to replace that essential roll of gluten in the dough. It kind of works, I guess. 

Pluses:
+ Pizza dough is ready to be used once you complete the recipe instead of needing the gluten to bond for hours (if not a day) like traditional pizza dough. 
+ Spreads like a dream. You wet your hands with water, then lightly apply pressure to spread the dough out across a lightly-oiled baking sheet. It's very easy to get the shape you want.
+ Rises quicker. If you want a thick-crust pizza, you only have to wait 15 minutes for the yeast to take affect and rise. 
+ You mix the dry and wet ingredients together with a hand mixer. It saves mess, kneading and time.

Minuses:
Very difficult to get a crisp thin-crust, which is my preference. 
Calzone-ing is near impossible.
Flavor is closer to that of bisquick biscuits than traditional pizza dough.

Here's a direct link to the recipe I used. Normally, I rewrite these things and 'make them my own,' but GF-cooking is closer to baking - you can't mess with proportions without disaster. 

I made a triple-batch of their recipe to get my three pizzas of around 12" each.

Ingredients: 
6 Tsp Yeast
3 Tsp Sugar
2.25 Cups Water
3 Eggs
3 Tablespoons Olive Oil
4 1/2 Cups GF Flour
6 Tsp Xanthan Gum
1 1/2 Tsp Sea Salt

Again, for directions, go here.

Where I diverged from the recipe was baking time and trying to make a calzone.

I baked my two dinner pizzas on 400f for about 10 minutes on each side. The crust was just beginning to get a golden brown hue. I knew I was going to finish these on the grill later, so I wanted to just get the dough firm enough to hold the ingredients. Whether you're grilling or not, I always recommend pre-baking the dough, then adding ingredients so that you make sure the dough bakes evenly throughout. 


As far as the calzone - the first attempt was a bit of a disaster. I spread the dough on a sheet of aluminum foil in a oval shape. I then placed my chilled ingredients of Nutella and mascarpone down the center. The tricky part was then folding the dough over and getting the edges to stick. With standard pizza dough, this is just a matter of pinching, but with GF-dough, you additionally have to worry about the top of the calzone tearing because there is no real give when attempting to stretch the dough over.

The first calzone erupted in the oven - luckily the aluminum foil acted as a barrier to creating a huge mess. 

On the second pass, I folded both of the calzone sides up toward the middle and pinched them. This made it look more like some distorted version of a dumpling, but it worked. I also kept the aluminum foil on the calzone for the first 20 minutes of baking at 400f to help it keep its shape. For the last 15 minutes, I peeled down the foil and cranked the over up to 500f to get some golden browning going on the crust.


Though the dough was a hassle to get right,  I feel confident that you could tweak it a bit to make it taste a bit better (ex: garlic-butter crust). I'm sure I will make it again at some point and it's worth exploring so you can appreciate how amazing gluten really is.

Tuesday, September 4, 2012

Homemade Flavored Bread Crumb Topping [Zack]

I try to find the good side of all situations in life.  When Lauren and I were visiting Italy, we had to book a hotel room by the airport so we could work remotely for a day (eww).  Since we were at the hotel all day, we ended up eating in the restaurant there.  The food was a little disappointing, but I still came away with a fun concept to try at home!

I had pasta with pears and gorgonzola.  It was topped with crunchy, slightly cheesey bread crumbs.  My mind started racing about how I could sprinkle these on a multitude of dishes to add a crispy and savory element.


These are easy to make and you can store them in the fridge and re-crisp them if needed.  It's a good way to use up that hard bread that has been sitting on your counter while you weren't in the mood for a sandwich.  I started with leftover wheat bread, but you can also do this with store-bought breadcrumbs.

Process:

The first step is to make sure that your bread is very dry and crunchy.  We are going to blend them in the food processor, and if the bread is still moist, it won't be fully chopped up.


I took day-old wheat bread and sliced it into strips for maximum surface area.  It will dry out more quickly in the oven.

Put your oven on a low temperature like 300F / 150C and place the bread on a tray.  It should take about 10 minutes to become crunchy, but make sure to watch it!  It will burn very quickly.

While your bread is in the oven, peel and loosely chop the shallots and garlic.  Toss them into your food processor and strip the thyme leaves in there.  Pulse until they are all diced.


Add the toasted bread in the food processor, right on top.


And process until it looks like breadcrumbs.


The next step is to toast these in a frying pan until they are extra crispy.  Add the crumbs into a medium-low frying pan and add 1/3 cup of olive oil.  Toss and cook for about 5 more minutes.


While this is cooking, loosely dice your cheese and put it in the food processor and blend until it's evenly grated.

Once the breadcrumbs are crunchy, remove them to a bowl.  Wait until they have cooled a bit and fold in the grated cheese.


You can use these to top many different things.  I'll post a few recipes using them soon:
  • steamed artichokes with herbed breadcrumbs and salami
  • baked eggplant parmesean
  • any nice pasta dish
  • Italian mac and cheese
  • in halved and then hollowed-out squash, baked
  • to top a roasted lamb rack (halfway through roasting, slather lamb in mustard, then stick the bread crumbs to it and continue roasting)
Ingredients:
(makes about 3 cups)
1/3 cup grated parmesean cheese
6 slices wheat bread
1 shallot
2 cloves garlic
7 sprigs thyme
1/3 cup olive oil

Jam to this:  Wax Tailor - Gaurenteed
Guaranteed (feat. A.S.M) by Wax Tailor on Grooveshark

Thursday, October 27, 2011

BBQ Sauce [Zack]

My passion for cooking took flight once I started to make BBQ sauce.  It all began when I moved out of the dorms my junior year of college and moved into a house with 4 other guys.  Because we finally had our own place, we made the leap from an undersized George Foreman grill (which was poised by our dorm window so we didn't activate the smoke alarm) to a real grill - even though it was only $30.  All of the roommates loved being social and having friends over, so it was natural that we started to grill for our guests.  Quickly the parties evolved from simple BBQs to all-out Dance Dance Revolution contests and Karaoke Revolution competitions.  The evolution wasn't just in the entertainment.  I was in charge of the grill and decided that making my own BBQ sauce should become my new mission.  Somewhere between all of the beers and ribs, I found that I have a love for entertaining.

I’m romanticizing a bit I think.  I had no idea where to start – naturally I checked out the back of a bottle of BBQ sauce in the grocery store, but that didn’t get me too far.  I remembered my Mom had given me a copy of The Joy of Cooking (in desperate hopes that I would be able to adequately feed myself on my own).  I flipped open the page, grabbed the necessary ingredients, and gave it a shot.  Along the way, there was a lot of frustration:  burnt bacon, blaring fire alarms, too much vinegar, too sweet, not enough spice, etc.  After a few iterations and lots of splatters on the page, I felt comfortable enough to start deviating from the recipe and try make it my own. 


After graduating college, I got new roommates but the mission remained the same:  grilling for friends.  But this time it was on Wednesday nights.  Dubbed “Wacky Wine Wednesday”, we had each friend bring a bottle of wine and we would all hang out in the kitchen and cook together.  BBQ sauce was a frequent experiment, sometimes being so hot a friend would explain “my esophagus is burning!”.  I have also made it for my co-workers as a Christmas gift, bottled in Ball jars.  We even spent an afternoon trying to sell it to passing cars (Tony was the best sales rep). 


In retrospect, it was one of the best things to learn to start my cooking journey.  Making this sauce teaches you so many skills: render bacon fat, sweat onions, reduce a sauce, and balance flavors / ingredients.  This version is both and expansion and consolidation of my knowledge.  I have tried a huge number of variations of the recipe, but this one is one of my favorites.  A great BBQ sauce hits on each of the taste elements: sweet, spicy, sour/tangy, salty, and umami.  They even hit your tongue in a specific order:  sweet, tangy, salty, spicy, smoky finish.  You can add this to grilled or baked chicken, a nice rack of ribs, pulled pork, or even grilled shrimp wrapped in bacon.

Process:

Start your pot on medium-low heat and dice your onion, garlic and bacon.  Add 1 T of olive oil and 1 T of butter to the pot and let the oil get hot.  Then, add in your diced bacon and cook until the fat is rendered - about 5 minutes.  Add in your diced onion and sweat for 5 minutes.  


Stir in the diced garlic and chiles, and cook for an additional 2 minutes. 

Deglaze your pot by adding in the ¾ cup vinegar, worchestershire sauce, and your Dijon mustard.  Stir to combine and scrape up any flavor bits on the bottom of your pot.  


Add in your chili sauce and stir.  Put in your Cheyenne powder, onion powder, chili powder, and black pepper.


Let the sauce reduce to a nice thickness for about 20 minutes.  Adjust your salt (remember the bacon is salty, so do this last).  This is what it should look like when it has reduced:


It’s best to add the sauce during the last stage of cooking.  If you are grilling, cook the meat until it's about 5 minutes from being finished.  Add the sauce and caramelize it over the grill.  The same method applies to baking - run it under the broiler for the last 5 mins with the sauce.


Ingredients:

3/4 cup vinegar
1 large white onion
3 strips smoky bacon diced
3 cloves garlic
2 heaping T of Dijon
2 T worchestershire
2 T Cheyenne powder
2 Birdseye chiles (optional!)
36 oz Heinz Chili Sauce
1 T onion powder
2 T chili powder
1 tsp black pepper

Creativity options:

Add peach, plum, or fig preserves (and leave out some of the ketchup)
Add curry powder
Replace 1/3 of the chili sauce ketchup with hoisin sauce for an asian flare.
Sriracha will enhance the spice level and give it a different finish
Liquid smoke may be considered cheating by some, but if you lack a grill or smoker, it can “recreate” a part that is lost.

Song – Al Green – Here I am

Friday, October 14, 2011

Technique: How to Dice an Onion Like a Chef [Zack]


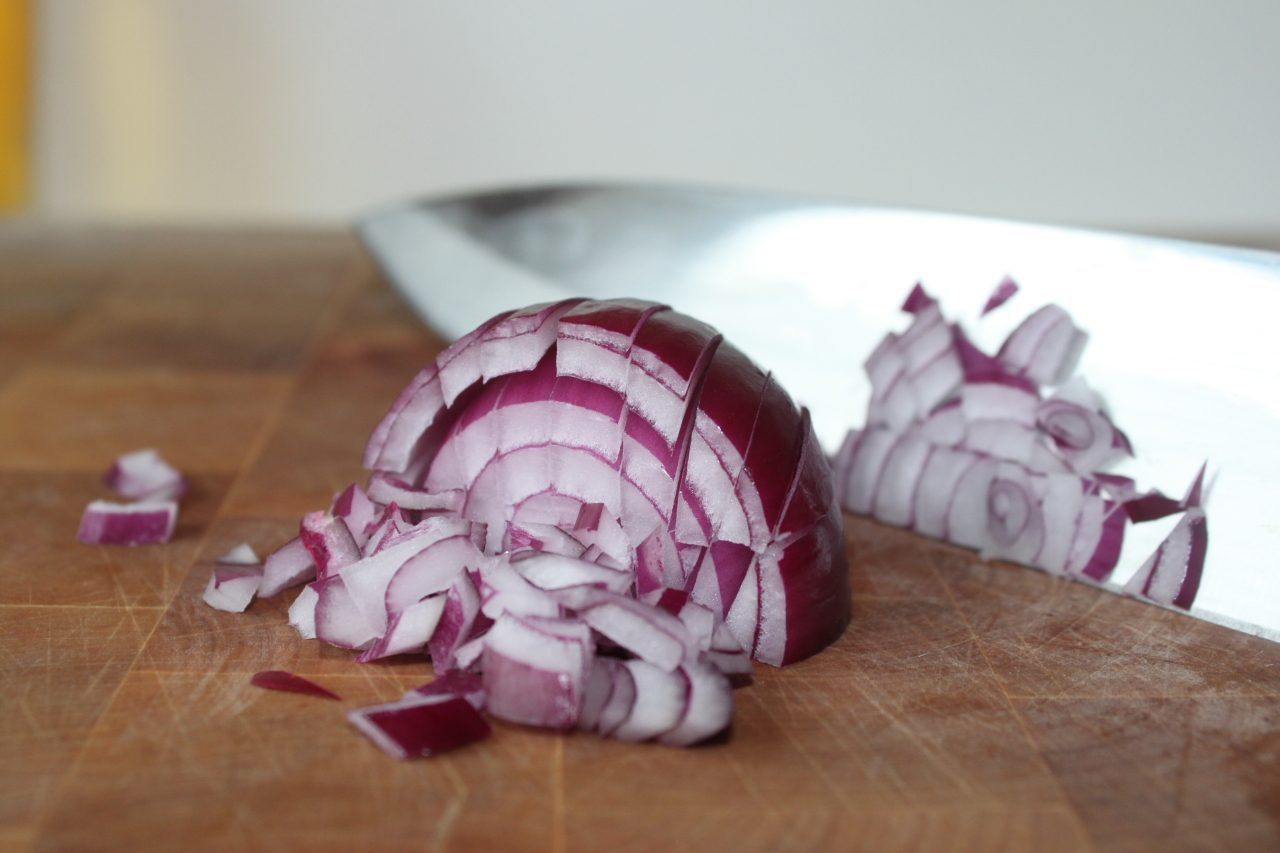
This is the best way to dice an onion quickly and evenly.  As you are learning the technique, it may feel slower in the beginning, but once you practice a bit, you can knock out quite a few onions in the time it used to take to do one.  It also offers you more control: adjust the thickness of the dice by spacing out your cuts to your liking.

Slice the onion in half from head to root.  Take off the outer skin and lay the onion flat on your cutting board and slice off the tops off of the two halves.  You want to keep the root on and intact because it will keep the whole situation together.  

Make one or a few horizontal cuts through the onion (depending on how thick the onion is).  Stop before you reach the end of the root.


Next, hold the sides of the onion, and make vertical cuts through the onion.  Again, don’t cut into the root.


 If you have a paring knife, you can use it to make the horizontal and vertical cuts.  I’ve survived without one for 7 years, so I think you will be okay. 

Now, take your chefs knife and slice the onion across the first 2 cuts so you have a nice dice.  Slice all the way up until you hit the root.  If there are a few stubborn big pieces, you can rock the knife through a few times. 


Song:  The Roots - Break you off

Thursday, September 29, 2011

Pressure Cooker Chicken Stock [Zack]

Chicken stock is a really special thing to make in the kitchen.  It costs you next to no money to make, but once you have it on hand, it feels as precious as gold.  I never would have imagined that I would become "stingy" with such an inexpensive ingredient, carefully apportioning and rationing the stock to each dish I make - it's not like it's black truffle.

Something funny occurred to me while writing this post: in the past very poor people used to use the carcasses of their chickens to stretch out their food and stay alive.  They would make stews to squeeze out the last nutrients from the animals they had raised.  These days, it's used as a flavor booster or a sauce enhancer in the fanciest of restaurants.  It seems like the "from scratch" cooking went from being necessary and entirely common, to a rare luxury.

Personally, one reason I love this ingredient because I got to (finally) teach my mom something in the kitchen.  I learned most of my cooking growing up in the family kitchen, doing small tasks and observing.  But making chicken stock as part of my cooking routine is something that I got to share with my mom.  Each time we talked, I would go on and on about how great making stock was, but she had a bad experience when she started cooking it.  I finally convinced her to make the stock again, and now we talk about different ways to use the stock in almost every conversation we have.

I've been experimenting with my pressure cooker because it seems to greatly speed up cooking times.  I looked online and using a pressure cooker didn't seem like a very popular method to make stock, so naturally I gave it a shot.  It amazed me that this method produced a really deep and dark stock in 1/3 of the time.  If you don't have a pressure cooker, just simmer the whole shebang for 3 hours, then strain.  Michael Ruhlman also has thought up a really creative shortcut to making a carefree stock that I will post on later.


Process:

Gather all of the bones and whatever is left over from your roasted chicken.  You can either save the bones in the freezer like I do, or you can make the stock right after dinner.


Place them in your pressure cooker and add the carrots, celery, garlic, black peppercorns, and onions.


Pour water over the bones, put the pressure cooker on high heat to let it come to an easy boil.  Let it go for 5 minutes and then skim off any funky looking foam and fat.  You can do this by dipping the edge of the spoon against the side of the pot.  To make it even easier, you can move the pot so only one corner is over the heat source.  All of the undesirables will appear on the opposite side of the pot.


(Notice that I have a mix of raw and cooked chicken parts - I had saved the backbones from my spatchcocked chickens.  If you use all unroasted bones, it's called a white stock.  I suggest using whatever you have on hand.)

Place the lid of the pressure cooker on and make sure it seals.  Add the pressure regulator cap and turn the heat down to medium-low.  Let it hiss for 45 minutes and then take it off the heat.  Let the pressure reduce naturally (should take about 15 minutes).


Make sure the cooker is de-pressurized before you open the lid.  The stock should smell like an intense chicken noodle soup.


Pick out the big bones and veggies with tongs and then strain the stock into another pot.  Rinse your pressure cooker and then strain the stock back into it.  For the second strain, you can use cheesecloth in the strainer if you have some, but my fine mesh strainer works well enough for me.

Reduce the stock down until it’s concentrated.  I suggest not adding any salt since you don’t know how you are going to use the ingredient in the future.  Unless you are using it within a few days and want to keep it in the fridge, you can freeze it in a few ways.  My mom loves freezing it in ice cube trays and then keeping the cubes in the freezer in ziplock bags.  I just pour the finished product into jars and place them in the freezer.  Don’t overfill the jars with the stock – the liquid will expand when you freeze it.


If you let it defrost after a few hours it will become just like Jell-o (because of the collagen in the bones) and the fat will solidify on the top.  This makes it easier to remove the fat – just scrape it off with a spoon. 

Ingredients:

Roasted bones of 2 chicken carcasses
1 medium onion
1 large carrot
1 stick celery
Small handful of black peppercorns
Water to cover the bones

Hopefully all of that rambling convinced you to try to make stock.  It's almost free and I can gaurentee it will elevate your cooking game.  It makes amazing soups, great fancy French sauces, and adds depth so you can swap out some of the heavy cream required for sauces.  Plus it's totally badass when you can say you made a soup totally from scratch.

Song to jam to:  George Michael - Careless Whisper