Showing posts with label Side Dish. Show all posts

Tuesday, June 17, 2014

Tom's Classic Caesar Salad [Zack]

I have very fond memories of learning to make a true caesar salad from my uncle Tom.  I went over to his apartment for one of our cooking sessions and was surprised that our grand adventure was making a lowly salad.  Surprisingly, crafting a classic caesar salad with Tom taught me a lot of useful tips!

We uncorked a bottle of white wine, turned up the music, and had an amazing meal.  I had never realized that the original Caesar salad didn’t contain cream, but did contain anchovies!  I learned a lot of through the process:
  • Adding the correct amount of anchovies to a recipe does not mean that you can necessarily distinguish their flavor, but they can quietly enhance the taste of the dressing
  • What a “coddled egg” is and how to soft boil an egg
  • That I should actually use an egg timer for its intended purpose instead of guessing – there are certain things in the kitchen that you can’t do by feel
  • It’s way more fun to learn how to make a classic recipe from scratch versus glopping it out of a squeeze bottle

Process:

Get a small pot of water boiling for your eggs.  Reduce the water to a simmer and place your eggs gently into the pot and start the timer.  Take 1 egg out after 4 minutes (coddled egg for the dressing), and leave the rest in until your timer has reached between 5 and 7 minutes.  Five minutes will give you a runny yolk, 7 will be “just set”.  Take the pot off the heat, gently pour out the hot water, and fill the pot with cold water to stop the eggs from cooking.  Peel the eggs after they have cooled off for 5 minutes.

Slice your day-old bread into cubes. Place them into a frying pan with a generous amount of butter + olive oil.  Keep an eye on the bread and make sure to mix it around frequently.   It’s up to you how you would like to flavor the croutons – my favorite is garlic powder, onion powder, black pepper, and some type of dried herb.

Now, on to the dressing.  If you have whole anchovy filets, you’ll need to add them to a bowl and mash them up with a fork.  This will take a bit of muscle/patience.  Once you have a paste, add the minced garlic and peeled coddled egg.  Mash these up with a fork a bit to combine.  Then, whisk in the liquids - mustard, red wine vinegar, and olive oil.  Crack a ton of black pepper into the bowl, and add the grated parmesan cheese.


In a bowl, toss the lettuce with the dressing and add any other toppings that you’d like.  I usually add sliced red onion, a soft-boiled egg, croutons, and sometimes sliced avocado.  You can get as creative as you’d like: shrimp, chicken, sliced leftover steak, etc.


Ingredients:
Makes 2 dinner-sized salads or 4 side salads

Dressing:
4 anchovy fillets or 1T anchovy paste
1 medium garlic clove
1/2T mustard
2T apple cider vinegar
4T olive oil
1 coddled egg (soft-boiled for 4 minutes)
1/3 cup grated parmesan cheese

Salad ingredients:
a head of lettuce
a few eggs
sliced parmesan cheese
day-old bread
herbs and spices for the croutons
olive oil
butter

Song:  Zusammenklang - Morgenblaue

Wednesday, July 3, 2013

Double Mushroom Wild Rice [Zack]

Wild rice can add an exciting texture to your plate.  It’s a nice change from the normal white or brown rice – it has a bit of a snap, similar to al dente pasta.  There are many ways to prepare the rice, but I’ve chosen a very simple preparation that maximizes flavor and minimizes ingredients.  I made this rice to accompany a roasted chicken.

Since you’ll use dried and fresh mushrooms, they will add a deep flavor to the rice.  You can skip using your precious chicken stock (but it wouldn’t hurt if you did)….


Process:

Slice the red onions into moons and measure out 1 cup of wild rice and 1 cup of dried mushrooms.


Combine everything into a covered sauce pot and add 2 cups of water.


Cook covered for 40 minutes on low, or based on the instructions on the box.  The mushrooms and rice will absorb the water during the cooking time.

While the rice is cooking, slice your brown mushrooms and heat up a pan over medium-high heat.  When the pan is hot, add a good ½ T of butter and some olive oil.  Put the mushrooms in the pan, season them with salt and pepper, and sauté for 8 minutes or so until they are nicely brown.


You will use the mushrooms as a base, and top them with the wild rice.

When the rice is finished, stir in a few T of cream (optional, but it adds a nice dimension).  Add salt and plenty of black pepper to the rice.  Cook for an additional minute or two to let the cream settle in.

Serve hot on top of your sautéed mushrooms!


Ingredients:
1 cup wild rice
1 cup dried musrooms
10 baby bella mushrooms
1 medium onion
2T-4T cream


Creativity options:
  • Add thyme and goat cheese instead of cream
  • Rosemary and crispy pancetta
  • Pulled lamb and tarragon
  • Orange juice and raisins
Song to wild out to: C2C - Down the Road
Down the Road by C2C on Grooveshark

Tuesday, April 30, 2013

Red Cabbage and Green Apple Cole Slaw [Zack]

If your pulled pork or BBQ'd meat needs a friend, cole slaw is a nice sidekick. It's crunchy, tangy, creamy, and a little bit sweet.

This was suggested by Katy to go on top of our pulled pork sandwiches. It paired perfectly with the oven roasted pulled pork sandwiches!


Process:

Shred your cabbage with a cheese grater on the large holes. Be careful not to get any of the red juice anywhere - it stains! Slice your green apples into matchsticks. Next, slice the red onions, and then combine everything into a bowl.

Make up the dressing by mixing the mayonnaise, dijon mustard, apple cider vinegar, honey, and soy sauce together. Taste the dressing and adjust if you want it to be creamier (more mayo), tangier (more vinegar/dijon), or sweeter (more honey).

Toss the veggies in the dressing and let the flavors combine until you are ready to serve.

Ingredients:
1 head cabbage, washed and shredded
2 red onions, sliced
4 granny smith apples, sliced into matchsticks

1/2 cup mayonnaise
4T dijon mustard
1/3 cup apple cider vinegar
2T honey
4T soy sauce
1/3 cup olive oil

Song to shred to:  Jamie Lidell - What's the use?
What's the Use? by Jamie Lidell on Grooveshark

Friday, April 12, 2013

Sweet Potato Hash Browns

In college, one of my "specialties" was to make hash browns for my roommates for breakfast on the weekends. I had created a very complicated recipe - I used a bunch of different powders, spices, and techniques.  It always took me forever, but I didn't mind because I was having a blast.   I'd make a nice side of bacon, scramble some eggs, and serve the home fries alongside.

I still like having crispy potatoes with my breakfasts.  It's interesting to see how my recipe has evolved from my college days.  I have distilled my crazy "hangover cure" recipe down to the essential steps and ingredients, and it's still as good as before.


Process:

Start by sautéing 1 diced onion in a pan in a little bit of olive oil over medium heat.  Let the onions soften, and then add cumin seeds, toasting them to bring out the flavor.  Add 1T of garlic butter.  Once you can smell the cumin and garlic, the sweet potatoes should join the party.


I pour some water into the pan (you can cover it if you like), and then steam the suckers.  Keep adding water like you would for risotto until the potatoes are fork-tender.  This should take about 20-30 minutes.

When the potatoes are a nice texture, let the water cook off.  Let the potatoes fry on the bottom of your pan, turning occasionally when one side is browned.

Serve next to some type of delightful egg dish.

Ingredients (serves 4 as a side dish):
2 sweet potatoes
1 large onion
1 tsp cumin seeds
1T paprika powder
salt and pepper
1T garlic butter (or normal butter mixed with 1 clove of chopped garlic)
1tsp olive oil

Funky Potato Song:  Jamie Lidell - What's the use?
What's the Use? by Jamie Lidell on Grooveshark

Sunday, January 27, 2013

Hoisin-Glazed Roasted Carrots [Zack]

A few of our friends decided that they were having an outdoor fish bake in January.  This idea would usually be met with skepticism (due to the snow outside), but we were on board immediately!  Hey, the grill is a heat source!

In our attempt to be good friends, we offered to bring over a vegetable side dish.  We originally wanted to make a roasted hoisin eggplant side, but the grocery store gods said "nay."  Instead, we found some fun looking mini carrots with parts of the green stem left on (for nice presentation.)

Not being one to cry over spilled hoisin sauce, we made the carrots and they paired perfectly with the fish.  The carrots were tangy, spicy, and a touch sweet and played nicely with the delicate fish.


Process:

Pre-heat your oven to 400F / 200C.  Wash and peel the carrots.  Place them in a large baking dish along with 1T of butter and 1T of sesame oil.  Roast in the oven for about 15 minutes too cook them through.


While that's going, start a small sauce pan over medium heat.  Peel and dice the ginger, garlic, and birdseye chiles.  Saute the stuff you just diced in 1tsp of sesame oil.  Once they have softened a bit, add in the oyster sauce, hoisin sauce, vinegar, and honey.  Cook for a few minutes to let the flavors combine.


Remove the carrots from the oven and give them a stir with a spatula.  Brush the carrots with the glaze, coating them evenly.


Place the baking dish back into the oven and cook for 5-10 minutes, until the glaze has caramelized.  Serve as a side and enjoy!


Ingredients:
1 lb carrots, peeled
1T butter
1T sesame oil

1 tsp sesame oil
4T oyster sauce
2T hoisin sauce
2T minced ginger
2 cloves garlic
2 birdseye chiles (or 1 if you don't like it too spicy!)
1tsp vinegar
2T honey

Funky carrot jams: Gramatik - Make You Better
Make You Better by Gramatik on Grooveshark

Tuesday, January 15, 2013

Roasted Eggplant with Olive and Red Pepper Tapenade [Zack]

Lauren and I love roasted eggplant (or aubergine for you Europeans).  The texture and flavor make it a great substitute for meat if you are trying to do the "Meatless Monday" thing.

This recipe is very simple - it takes you less than 5 minutes of active cooking time.  You'll cross-hatch and roast the eggplant for flavor, then add more flavor on top and finish it in the oven.  You can even pre-make these a few days before a dinner party and then throw them back into the oven to finish.

These roasted eggplant halves work great as a healthy side dish to accompany a wintery meal, or they can be the star of the show if you serve them with a simple salad.


Process:

First, heat up your oven to 400F / 200C.  Wash your eggplants, remove the top, and slice them in 1/2 longways.  With a sharp knife, cut into the flesh of the eggplant about 1 inch deep, keeping the skin intact.

Then, place the halves on a baking dish and rub them with a light amount of olive oil.  No real need to salt the eggplant as the olive tapenade contains salt.  Place them in the oven, cross-hatched side up and roast until they develop a nice browned surface and have softened throughout.  It should take about 15-20 minutes.


While this is going, mix together your equal amounts of olive tapenade, and roasted red pepper tapenade in a bowl.  Once the eggplant comes out, spoon the mixture over the cut side and work it into the crevices.


It is now ready to go back into the oven to develop some color on the tapenade and to heat everything through.  It should take another 5-10 minutes.

Garnish with some fresh parsley and serve!

Ingredients:
  • eggplants, halved

(per eggplant)
  • 1T green olive tapenade
  • 1T roasted red pepper tapenade
  • freshly minced parsley

Creativity options:
  • top the tapenades with breadcrumbs and a brushing of olive oil for a nice crunch
  • mix in some goat cheese
  • add 1/4 minced anchovy filet and a few minced capers into the tapenade for a depth of flavor
  • you can even substitute some pulled pork or pulled beef for the tapenades, adding cheese and a nice cumin-y thick tomato sauce.

Song to cross-hatch to:  James Blake - The Wilhelm Scream
The Wilhelm Scream by James Blake on Grooveshark

Tuesday, October 23, 2012

TUSCANA STYLE GRILLED VEGGIES Inspired by Zack and Lauren (TOM)


Soon after returning from a wonderful wedding trip, June and I were discussing the great food we enjoyed in Italia. We decided to keep the Tuscany theme going. When you cut the tomatoe it seems to explode into a pomodoro sauce. This is a light but highly flavorful meal. Add a salad or a chunk of bread or both. A glass of vino with this meal is highly recommended. This recipe is for 2 dinners.


HERE IS WHAT YOU WILL NEED FOR THE COATING

~ 4 cloves Garlic
~ 1/3 cup EVOO
~ 8 leaves fresh Basil
~ 1/2 teaspoon fresh Rosemary
~  8 leaves fresh Italian Parsley
~ 2 tablespoons fresh Chives

Finely chop all the herbs and Garlic. In a cup mix into the oil and set aside

HERE IS WHAT YOU WILL NEED TO GRILL AND FINISH  

~ 1 Fennel bulb
~ 1 red or orange Pepper
~ 1 yellow Squash
~ 2 Tomatoes
~ 1 red Onion
~ 1 Eggplant
~ Salt and Pepper
~ chunk Parmesian Cheese cut into bit size pieces
~ 3 fresh Basil leaves
~ 3 fresh Italian Parsley leaves

Slice all the vegtables lenghtwise 1/3 - 1/2 of an inch thick except for the fennel and the tomatoe.
Slice the top of the tomatoe and cut the fennel bulb leaving a stalk for each cut. Fire-up the grill.
Liberally coat all the veggies on both sides. Salt and pepper to your liking. Grill the veggies on a medium fire until soft but not mushy. Do not turn the tomato. Plate and top with the chunks of cheese, basil and parsley.

Boun Appetito

Ciao


Sunday, August 26, 2012

Simple Summer Sweet Corn [Rhonda]


Degree of difficulty: super easy
Time: 5 to 10 minutes, depending on how quick you are with a knife
Serves: 2 to 4

A recent trip to the New Albany Farmers Market yielded an abundance of beautiful, just-picked white sweet corn. In lieu of firing up the grill and roasting it with chile lime butter, or steaming it on the cob, I quickly removed it from the cob, added a little butter and salt, briefly warmed it and stirred in a spoonful of creme fraiche at the end. It was heavenly, and all the rich, simple corn taste came bursting through.

Ingredients:
4 ears white sweet corn (Silver Queen, perhaps)
1 to 2 tablespoons butter
Dollop of creme fraiche or 2 tablespoons heavy cream
Sprinkle of sea salt

Serve warm.

Suggested soundtrack: Jason Mraz and Colbie Caillat's "Lucky"
Lucky by Jason Mraz And Colbie Caillat on Grooveshark

Sunday, August 5, 2012

Asian Confit Pork Belly [Zack]

Can you recall a time when you were eating ribs and they were so tender that the meat fell straight off the bone?  Have you ever had a piece of cooked bacon where the fat is juicy and slightly crisped?  How about a dish where 5-spice was the star of the show?

If you combine all of those heart-racing memories, that's the definition of a good confit pork belly.  You already know the ratio of meat to fat in pork belly if you have ever seen a piece of uncooked bacon (bacon is made from the belly of the pork).  When the belly is cooked slowly, the meat portion becomes tender like pulled pork.  The fat portions melt in your mouth, and the asian 5-spice flavors sing throughout the whole experience.

It is a perfect appetizer, or the star of a rice bowl with vegetables. You can make this a few days before you entertain and let it sit in the fat in the fridge (see: confit duck legs).

This continued craze over bacon will hopefully cross over to the real thang.  Why?  Because it's somehow way more socially acceptable to have a chunk of confit pork belly instead of a whole plate of bacon for dinner.....


Process:

Divide your pork belly up into 4 individual servings.  Sprinkle with 5-spice powder, coriander, and salt.  Let it rest while you prepare the rest of the recipe.


Get a pot going on medium-low heat with 1T of sesame oil.  Once it has heated up, brown all 4 sides of each of the sections of belly.


Take the pot off of the heat once you have browned everything and add in the rest of your oil until the bellies are fully covered.  Toss in your whole garlic cloves - skin-on is okay.  Place the lid on the pot and put it in an oven at 200F / 100C.


Let it slowly cook for 5 or 6 hours.  Check to see if it's meltingly tender by pricking it with a knife.  If your pork belly had a bone in it, the meat will shrink away, exposing the bone.


You can either serve right away, or put it in the fridge once it has cooled off.  If the meat is submerged, it should keep for a few weeks.  To serve at a later time, you can heat the whole pot up, or put it in a frying pan with a little of the oil to warm it through.


Ingredients:
4 slices pork belly (bone-in is fine as well)
1/2 tsp coriander powder
1.5 tsp 5-spice powder
1 tsp salt
6 whole cloves of garlic
1T sesame oil
~3 cups canola / peanut oil

optional:  top with some sriracha or hot chiles

Creativity options:
  • Mexican:  substitute cumin instead of 5-spice, top with a fresh green salsa
  • Greek:  continue with the cumin idea, make a feta and yogurt sauce.  OR make friends with a nice butcher and get your hands on some lamb belly
  • Italian:  remove the 5-spice, throw a few juniper berries into the oil. Puree rosemary, garlic, and tomato paste together with a bit of olive oil for the sauce.
Song - The Roots - Duck Down
Duck Down by The Roots on Grooveshark

Tuesday, March 20, 2012

Roasted Vegetable Gratin [Zack]

Here is a nice non-meat side dish or appetizer that you can easily whip up.  Roasting the vegetables first in the oven adds a deeper flavor profile.  This is great next to a grilled chicken breast or a sandwich!


Process:

Pre-heat your oven to 400 F / 200 C.  Wash and slice your eggplant and squash.  You want them to be about 1/4 of an inch wide and even thickness so they roast evenly.  Add a splash of olive oil to your baking trays and add your slices of vegetables.  Sprinkle them with salt and black pepper and roast for about 20 minutes until nicely browned.

When the veggies are roasting, we have time to make a simple red sauce.  Dice 1/2 an onion and put in a low pan with 1 T of olive oil.  After 3 minutes, put in 2 peeled garlic cloves and a few fresh basil leaves.  Cook for 2 minutes and then add your pureed tomatoes.  Let this cook for about 10 or 15 minutes until nicely reduced.  Add a pinch of salt and black pepper.


Cover the bottom of a baking dish with a thin layer of sauce.  Arrange your roasted veggies in the dish.


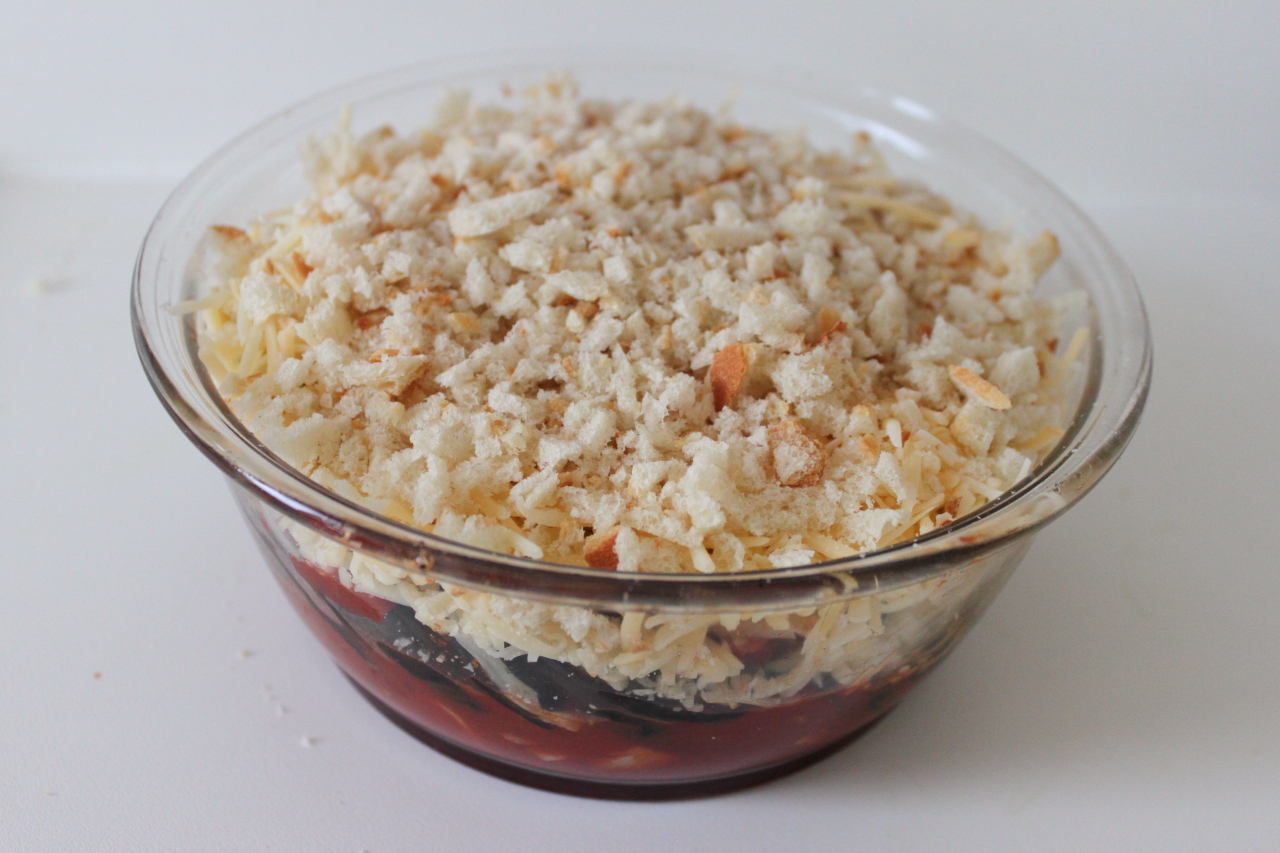
And then top with the grated cheese and breadcrumbs.  Bake this at 400F / 200C until it's heated through and the top is nicely browned.


Ingredients:
1 eggplant
1 yellow squash
1 green squash
1 or 2 T olive oil
1/2 cup gruyere cheese

28 oz tomato puree
1/2 medium onion
2 cloves garlic
handful of fresh basil leaves
1 T olive oil

Song:  Pharrell Williams - Take it off

Sunday, January 22, 2012

Best-ever Brussel Sprouts [June]

These don't taste at all like the bitter brussel sprouts that alot of us have had that made us never want to eat them again! As we all know, everything is better with bacon and that might just be the key ingredient that makes the difference.
Ingredients:
Brussel sprouts (but you knew that) - I used approximately 12
2 Slices Bacon (preferably thick - and more if you like bacon)
1/4 Cup Onion
2 Tbsp Brown Sugar
Cut stems from brussel sprouts, cut in half and peel away any loose leaves.
Dice bacon into small pieces and fry until crispy. Add onion to pan and cook under translucent. Add sprouts. If it looks a little dry, add a little white wine or vermouth. Saute until sprouts are lightly browned & tender. Add brown sugar and let cook until sprouts begin to caramalize.
We served this as a side with Grilled Curry-Fig Turkey (that Tom posted a couple days ago) and grilled sweet potatoes.

Thursday, December 22, 2011

Citrus Salad Topped with Cracked Glass [Rhonda]


Degree of difficulty: easy to medium, depending on the weather
Time: 20 to 30 minutes prep (How good are you with a paring knife?)
Serves: 4

This has got to be one of the most unusual, prettiest, and delightfully refreshing salads I've ever had. (Sounds like a commercial for Florida citrus growers, doesn't it?) Kate Thomas brought this to the New Albany Cooking With Friends gathering in November, and whether or not it reflects her Louisianna roots or her husband Tony's Missouri upbringing, she says it has been a Thanksgiving tradition at their house as long as she can remember.

Don't file this under Turkey Day, though, because it will stand as a beautiful side dish year-round.

Having said all that, the first time I made it for two, it was a breeze and took practically no time.

Second time was in volume for our Christmas trip to SC and I might as well have been a first-time-in-the-kitchen know-nothing. Embarassing to admit, but I finally had to google "how to peel a grapefruit" because I was struggling with pith and section skins, while sticky juice ran down my arm, onto my jeans and dripped on the floor. (There's a most helpful YouTube video with a chef who suggests you slice a little off the ends of the grapefruit so it stands up by itself, peel it with a sharp knife, removing all the white pith, then section it by slicing down through one side of the grapefruit wedge, prying the wedge loose from the other section skin. That keeps the sections in a more desirable shape, ie whole, as opposed to the mashed and mangled bits I was producing.)

The pomegranate seeds take a bit of time to extract and separate. (And yes, there were crimson splatters on the white cabinets when I was done. I told you that particular day was amateur hour for me.) You can buy a container of pomegranate seeds at Trader Joe's. Just be aware they don't keep too long.

Now, about that cracked glass. Again, first stroll out with the recipe for two took no more than a few minutes. But all the cooking for SC was done on a rainy day. My first attempt at the cracked glass that humid day sported hard knots of sugar crystallized in the amber. Tossed it and began again. Second attempt went fluffy. Really fluffy, as in fresh-powder-snowfall-at-Deer-Valley fluffy. Tossed. (By then, time was short and I'm starting to get tense...) Third time, I slowly melted the sugar over lower heat, stirring constantly to eliminate any sugar crystals, then whisked continuously as I upped the heat. It worked.

Worth the effort, too. Kristi and Alena, my 7- and 3-year-old nieces, were mightily impressed, especially with the cracked glass. "More?" Alena demanded, smiling and nodding. "L'il more?"


Citrus Salad Topped with Cracked Glass
Ingredients:


2 oranges
2 pink grapefruit
2 white grapefruit
1 pomegranate, seeded
Butter lettuce for plating

Peel citrus fruit, making sure to remove all white leaving only citrus exposed; slice fruit between membranes into large bowl.


Add seeds from pomengranate. Refrigerate until ready to serve.

Cracked Glass Topping
1 cup sugar
1/4 cup water

In a heavy saucepan over medium heat, carefully stir sugar in water until the sugar melts.


Raise heat and cook until liquid turns a light amber color. Pour hot mixture to thinly coat aluminum foil and let harden.


Crack into little pieces when ready to serve.

Mix citrus well. If plating, put a leaf of butter lettuce on salad plate, add mixed citrus salad and top with cracked glass.


If serving from a bowl, line the bowl with lettuce before adding citrus. Top entire bowl with the glass topping.

Suggested soundtrack: Rockin' old schoool with Earth, Wind and Fire's "September"

Friday, December 9, 2011

Fall in Love with Artichokes. [Michael]


When Rhonda and I first started dating, we went to Dorian’s Red Hand,
a restaurant on Second Avenue in New York. On the menu were artichokes served with hollandaise sauce. I told Rhonda that my Mom use to make them all the time for us when they were in season.

Up until then, Rhonda had never had an artichoke. Since I don’t like sharing, we ordered two. As the leaves dwindled down to the core, I took a spoon and scooped out the fibrous hair from the heart and ate my favorite part the artichoke bottom. Rhonda gave me hers as well and that’s when I knew that I was definitely in love.

Nick visited us this past Thanksgiving and I asked him if he wanted to learn his grandmother’s recipe for stuffed artichokes. We had four. Since the artichoke leaves have sharp thorns, trim the thorn off the top of each leaf. Next, cut the stem from the bottom of each one. Mix bread crumbs, salt, pepper, crushed garlic and diced peppered salami together in a mixing bowl. Open the artichoke so that each leaf is exposed. Spoon breadcrumbs into each leaf. Pour just a little olive oil on the top and place the artichokes in a pot. Add enough water to come up to the middle of the four chokes. Cover the pot and steam until tender. Salt can be added to the water. When are they done? When you can pull a leaf from one of the artichokes, and it comes off easily.

How to eat them? There’s no easy way.
Leaves are removed one at a time and the soft breadcrumb is scraped off each leaf using your teeth. Just make sure that there’s an empty dish on the table for everyone to put their discarded leaves. I’ve had artichoke leaves dipped in hollandaise, and in just melted butter. I’ve included a photo of a dipping sauce of oil, vinegar and a chopped boiled egg, served this way at Laurent, a famous restaurant in NYC.


Ingredients:
1 cup of breadcrumbs
6 garlic cloves
6 slices of peppered salami (or, pepperoni, or cooked sausage)
Salt & pepper to taste
3 tablespoons of Parmesan cheese

Monday, November 14, 2011

Party Guacamole [Zack]

I'm not sure whether pounding spices in a mortar and pestle actually enhances the flavors in a dish. In my mind, a pesto pops more and guacamole is more intense when the ingredients are pounded. I haven’t read a definitive study proving that you get superior flavors, so let's assume that I’m imagining it.  Who cares? Your guests will love your guac presentation in the mortar and the placebo effect has never tasted better.

Guacamole is one of my favorite things to make.  I like mine to have a lot of flavor with a big back-end of spice.  Once you get a hang of balancing the tastes, you will find it’s very easy to make.  My buddy Mike Kelley and I have extensively tested this recipe by making multiple batches at multiple parties.  It was really tough work, but we ended up with a very good guacamole and Mike ended up getting a mortar and pestle solely for guac production.  It has become an unwritten rule that whenever Mike shows up to a party and people are bringing food, he will show up at the party with this guac recipe in his hands.

You can make this in a bowl, but it's much more fun in a mortar and pestle. 


Process:

Pour a cold beer into a glass.

Below is a picture of all of the ingredients you will need.  I omitted the jalapeno for the pic, but you should add it if you can handle the heat.


First, get your 2 garlic cloves and put them on a flat surface.  To peel them, lay the broad side of a knife on top of the cloves and then hit the knife with your fist to smash the cloves.  They are really easy to peel then.  Take a sip of beer.  Put the garlic in the mortar and add 1 T of coarse sea salt and 1 tsp of whole black peppercorns.  The salt will help you grind the garlic to a pulp.  Go to town.


Next, you need to add your cilantro leaves.  I don’t like wasting the stems since they have good flavor, so I roughly chop the leaves and stalks before adding to the mortar.  Grind this to a pulp.  Take a sip of beer.


Dice your onion, and add to the bowl.  Give it a bit of a beating to release flavor, but don’t mash all the way.  Beer.


Here is the time to prove your spice tolerance.  I chopped up a hot pepper and added it to the mortar and mashed.  If you are cooking for people who can handle the spice or will try it on a dare, you can add 1 deseeded habanero pepper instead…


Dice your tomatoes and drain all of the water out of them.  You can do this by simply squeezing them over a sink.  You will end up with a soupy and watery guacamole if you skip this step. This is hard work, so take a good sip.  


The next step is to add your avocado*.  Slice it in half long-ways and twist it 90 degrees like you are winding up an egg timer and you will have 2 halves in your hand.  The pit will stay in one half – to extract, nick it with the blade of your knife and turn it 90 degrees just like you did the two halves.  Drink some more beer.  Scrape out the insides and use two spoons to mash and chop the fruit.


*Note:  How to choose a perfect avocado:  The avocado should be a nice, dark color and have a similar feel as an ripe orange when you press on it.  If it gives too much, it’s overripe and if you get ones that are not yet ripe, you will have to wait a few days.  I prefer Haas avocados (they are the most common).

Roll your limes using the weight of the palm of your hand to loosen up the juices.  Slice them in ½ and squeeze the juice out into your bowl and mix. 

Taste and adjust the seasoning – if it needs more acid, add lime.  If you need more flavor, add a touch more salt.  


You should be finished with your beer just in time to grab a fresh one and some chips and enjoy!!

Ingredients:

2 cloves garlic
1tsp coarse sea salt
small handful peppercorns
1/2 small red onion
1/2 tomato
30 cilantro leaves
1 1/2 limes juiced
1 cold beer

Serving suggestions:
With chips (of course)
On tacos of any kind:  fish, beef, pork, chicken, shrimp
On top of grilled chicken
Top a Mexican salad with a big spoonful

The White Stripes – Hello Operator