Sunday, December 25, 2011

Homemade Cinnabons! [Lauren]


Merry Christmas from the Belgian Mama Tommy's contingent!

Zack and I wanted to start a fun tradition on Christmas morning, so we unanimously (all 2 of us) decided to make homemade cinnamon rolls for breakfast!  And of course if I'm baking anything, Zack always manages to convince me that adding alcohol would enhance the recipe.  So it should come as no surprise that there's also a shot of rum in this icing to add extra Christmas "spirit"... (haha, ok bad joke).


Process:

Dissolve the yeast in milk warmed to 110*F (no hotter or you'll actually kill the yeast).  The yeast mixture should get bubbly after a few minutes, but if it doesn't- don't worry, the recipe will still work.  Combine the yeasty milk in a bowl with 1/3 cup melted butter, eggs, sugar, and salt.  Once combined, add the flour and knead the dough for ~5 minutes.

Place dough back into the same bowl and let it sit in a warm spot for an hour, covered with a towel.  I like to use the oven on the lowest setting.  After an hour, the dough should have doubled in size.  Beat down the dough (which is quite fun actually) then roll it out into a square shape using a rolling pin.

Brush 1/4 cup melted butter on top and then sprinkle with brown sugar and cinnamon.  Roll the dough into a long tube and cut 12 even pieces to form the cinnamon rolls.  Arrange in a buttered baking dish (9" x 13").  I added an additional pad of butter to the top of each roll and then sprinkled with more cinnamon and brown sugar.  This melted down into the rolls and made them even more gooey and delicious.

Bake in a 400*F oven for 15 minutes, or until the tops are a nice golden brown.

While these rolls are in the oven, make your icing.  Using an electric mixer, combine cream cheese, 1/4 cup butter, confectioners' sugar, vanilla extract, and salt. Here's where you can add the optional shot of rum for an extra kick.

Spread the icing all over your buns (the cinnamon buns, not to be confused with any of your other buns).... and enjoy!!


I think it's safe to say these will become a family tradition for Zack and me :)


Ingredients:
1 cup warm milk (110* F / 45*C)
2 eggs, room temperature
1/3 cup butter, melted
4 1/2 cups flour (I recommend patisserie flour since it's fine texture yields very silky buns)
1 teaspoon salt
1/2 cup white sugar
2 1/2 teaspoons yeast

1/2 cup brown sugar, packed
2 tablespoons ground cinnamon
1/3 cup butter, softened

1 (3 ounce) package cream cheese, softened
1/4 cup butter, softened
1 1/2 cups confectioners' sugar
1/2 teaspoon vanilla extract
1/8 teaspoon salt


Suggested Track:  Zanna by Selah Sue & Tom Barman

Friday, December 23, 2011

Speedy Christmas Eve Cookies [Rhonda]


Degree of difficulty: baby easy
Time: 10 minutes
Serves: 10

If there are little ones around--these cookies will be a perfect Christmas Eve project. Connie made these with Kristi and Alena and they were most delicious.

Merry Christmas!

Christmas Eve Cookies
1 package cool mint Oreos
12 ounces white chocolate, melted
Red and white candy canes, chopped

Melt the white chocolate, dip the cookies one by one in it, place the cookies on wax paper, sprinkle with candy cane bits and cool.

Suggested soundtrack: Ella Fitzgerald's "Have Yourself a Merry Little Christmas"

Thursday, December 22, 2011

Citrus Salad Topped with Cracked Glass [Rhonda]


Degree of difficulty: easy to medium, depending on the weather
Time: 20 to 30 minutes prep (How good are you with a paring knife?)
Serves: 4

This has got to be one of the most unusual, prettiest, and delightfully refreshing salads I've ever had. (Sounds like a commercial for Florida citrus growers, doesn't it?) Kate Thomas brought this to the New Albany Cooking With Friends gathering in November, and whether or not it reflects her Louisianna roots or her husband Tony's Missouri upbringing, she says it has been a Thanksgiving tradition at their house as long as she can remember.

Don't file this under Turkey Day, though, because it will stand as a beautiful side dish year-round.

Having said all that, the first time I made it for two, it was a breeze and took practically no time.

Second time was in volume for our Christmas trip to SC and I might as well have been a first-time-in-the-kitchen know-nothing. Embarassing to admit, but I finally had to google "how to peel a grapefruit" because I was struggling with pith and section skins, while sticky juice ran down my arm, onto my jeans and dripped on the floor. (There's a most helpful YouTube video with a chef who suggests you slice a little off the ends of the grapefruit so it stands up by itself, peel it with a sharp knife, removing all the white pith, then section it by slicing down through one side of the grapefruit wedge, prying the wedge loose from the other section skin. That keeps the sections in a more desirable shape, ie whole, as opposed to the mashed and mangled bits I was producing.)

The pomegranate seeds take a bit of time to extract and separate. (And yes, there were crimson splatters on the white cabinets when I was done. I told you that particular day was amateur hour for me.) You can buy a container of pomegranate seeds at Trader Joe's. Just be aware they don't keep too long.

Now, about that cracked glass. Again, first stroll out with the recipe for two took no more than a few minutes. But all the cooking for SC was done on a rainy day. My first attempt at the cracked glass that humid day sported hard knots of sugar crystallized in the amber. Tossed it and began again. Second attempt went fluffy. Really fluffy, as in fresh-powder-snowfall-at-Deer-Valley fluffy. Tossed. (By then, time was short and I'm starting to get tense...) Third time, I slowly melted the sugar over lower heat, stirring constantly to eliminate any sugar crystals, then whisked continuously as I upped the heat. It worked.

Worth the effort, too. Kristi and Alena, my 7- and 3-year-old nieces, were mightily impressed, especially with the cracked glass. "More?" Alena demanded, smiling and nodding. "L'il more?"


Citrus Salad Topped with Cracked Glass
Ingredients:


2 oranges
2 pink grapefruit
2 white grapefruit
1 pomegranate, seeded
Butter lettuce for plating

Peel citrus fruit, making sure to remove all white leaving only citrus exposed; slice fruit between membranes into large bowl.


Add seeds from pomengranate. Refrigerate until ready to serve.

Cracked Glass Topping
1 cup sugar
1/4 cup water

In a heavy saucepan over medium heat, carefully stir sugar in water until the sugar melts.


Raise heat and cook until liquid turns a light amber color. Pour hot mixture to thinly coat aluminum foil and let harden.


Crack into little pieces when ready to serve.

Mix citrus well. If plating, put a leaf of butter lettuce on salad plate, add mixed citrus salad and top with cracked glass.


If serving from a bowl, line the bowl with lettuce before adding citrus. Top entire bowl with the glass topping.

Suggested soundtrack: Rockin' old schoool with Earth, Wind and Fire's "September"

Wednesday, December 21, 2011

Venetian Ragu Spaghetti Bolognese [Zack]

We invited our neighbors over for dinner one night and mentioned that we were going to Venice for Carnival the following weekend.  The first thing they said was, "you have to find our favorite restaurant there.  They make the best ragu ever!"  

There was one small problem.  They loosely knew where to find the restaurant, but forgot the name and the exact address.  The only clues we had were:  it has an all-wooden entrance way and they make amazing buffalo mozzarella in the summer.  

When we got to Venice, we looked for the restaurant for about 45 minutes, got too hungry and gave up.  We had a great meal at another small place and were stuffed.  As my luck goes, turned out of the restaurant, and found the place our neighbors raved about on the next block.  Because we're pigs, I declared we are going to have to find some room to fit a small serving of the famous ragu.  It was delightful!  Meat was very tender and it wasn’t overly sauced.  There wasn’t a huge amount of tomatoes in the sauce and the final finishing touch was a hint of cinnamon in the sauce.  

I figured it would be fun to cook the sauce for our neighbors for the next dinner party and see if they thought it was near to the original.  Consensus was that it was pretty darn close.


Process:

Chop and dice all of the veggies for your ragu. 


Start your stock pot on medium heat. When it’s ready, add 1 T of olive oil.

Brown the Beef in batches. If you overcrowd the pot you will steam the beef instead of getting good caramelization. It will take 5-8 mintues per batch.


Once you have finished the beef, remove it to a plate.  Sweat the vegetables in the same pot.  You can add these in one batch and cook for about 5 minutes.  Add the beef back in.


Now, add in your tomato sauce, wine, and cinnamon.  Bring to a simmer and cook on low heat for 2-3 hours.


This is what it will look like when it's reduced:


Add in your super fancy Mickey Mouse whole milk to add some silkiness to the sauce.  Cook on low heat for about 15 minutes while you prepare your pasta.


Cook your pasta according to the directions on the package, or make some fresh :)

Toss your pasta with the sauce, top with some parmesean reggiano, and enjoy with a dark Belgian beer (such as the Westvleteren below).


Ingredients: (yields a lot!)

1 lb ~90% Ground Beef
1 lb Ground Pork
¼ cup Diced Carrots
½ cup diced onions
¼ cup diced celery
1 T cinnamon powder or 2 cinnamon sticks (extract sticks when finished)
1 28 oz can crushed tomatoes
1 glass red wine
½ cup whole milk
1/3 cup parmesean reggiano
a few Belgian beers to drink with dinner 


Bilal - Slyde

Tuesday, December 13, 2011

Chinese Smoked Pork Cabbage Rolls [Zack]

Sometimes mistakes in the kitchen work in your favor. Shopping in a Flemish supermarket requires a good amount of skill - you need to be able to recognize cuts of meat by sight if you can’t read the packaging. I was in a hurry and grabbed 2 pork loins but accidentally got the “cold smoked” version.  They call it "Ardeneese" because it's of the style of the southern Belgian Ardenne mountains.  Cold smoked looks very similar to the non-smoked version because no heat is used in the smoking process. Therefore, you don’t get any browning on the meat and it’s hard to tell the difference.

I was taking pictures of the ingredients for the website and noticed that the pork loins were very shiny. When I picked one up, I noticed there was a pellicule on the outside and immediately realized I ended up with a smoked version. A combination of perfect daytime lighting for pictures, stubbornness, and the grocery store closing at 1pm on a Sunday helped create this recipe.

I used a dish from Particolare (one of my favorite restaurants in Antwerp) as inspiration for this recipe. They stuffed cabbage leaves with a rich Italian pork filling and then steamed them. I loved the idea and wanted to try it with an Asian twist.


Process:

Gather your ingredients for your mise en place.


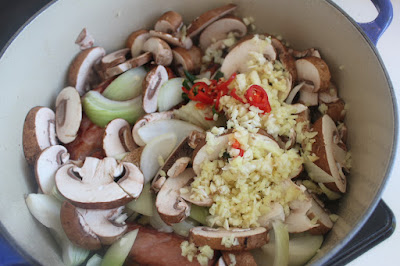
Dice and cut your vegetables so you have a proper mise. While you are doing this, heat up an oven-proof pot to medium heat.  Add 2 T of oil to the bottom of the pan and brown your pork loins on all sides for about 2 mins per side.


Remove the loins to a nearby plate and add in your vegetables including the ginger and garlic. Saute these for about 5 minutes, then add the pork back in.


Then, put in your stock, vinegar, the remaining sesame oil, and Hoisin sauce. Bring to a simmer, then place into a pre-heated oven at 300 F / 175 C.


Cook for 3-4 hours (depending on the thickness of your loins) until you can easily slide a knife into the pork. Think very tender BBQ rib texture….

Take the pot out of the oven, remove the pork and pull it with a fork (or your fingers) and then mince.


Put the vegetables and sauce into a food processor and blend until smooth.


Add back to the minced pork.


Here’s how to wrap them in your lettuce leaves:

Start a pot with some water and bring it to a simmer. Cut out the stem from the cabbage so it frees up the leaves a bit. Roll the cabbage around in the water until you can easily peel off the top leaf. You will be able to do 1 per minute or so depending on how fast your water is going.


Take each leaf and place a heaped tablespoon-sized amount of filling into the leaf.  Fold the bottom up over the pork, then fold the top down, then fold the sides in.


Set up a steamer in about an inch of boiling water.  Steam the rolled cabbage for 10 minutes (or until the leaves are softened and the contents are heated through.  Serve and enjoy!


Ingredients:

3 T Hoisin Sauce
1 cup chicken stock
3 T rice wine vinegar
3 T sesame oil
2 cups chopped mushrooms
2 medium onions chopped
4 cloves minced garlic
1.5 inches minced fresh ginger
3 birdseye chiles (to taste)
1 T salt
2 Smoked Pork tenderloins (Ardeneese), or use regular if you can't find

Creativity options:

You can stuff cabbage leaves with whatever you want.  It's similar to making your own gyoza or ravioli.

  • Italian style - use normal pork loins, and omit the Hoisin sauce, sesame oil and ginger.
  • Add tomato sauce to the above instead of chicken stock
  • Slow cook sausages and red peppers together in stock or beer.  Dice, then wrap.
  • Don't steam the leaves and make "PF Chang" style lettuce wraps.  Add some cashews!
Song:  Robin Thicke - Jus Right


Saturday, December 10, 2011

Molten Chocolate Cakes [Rhonda]


Degree of difficulty: easy if your oven works right, tricky if it's like mine and doesn't hold a true temperature
Time: 15 minutes prep, 10 to 12 minutes cooking time
Serves: 4

Molten chocolate. What, I ask, could be better?

For the past decade and a half, individual chocolate cake with a liquid center has been de rigueur at high-end Columbus restaurants. Chef Tami Cecil, who conducts cooking classes out of a big barn structure at Woodhaven Farms, near Johnstown, OH, shared this version at one of those classes.

It's not hard, but until you've made it once or twice, when to call it done is a bit mysterious. Because the center is supposed to remain gooey. If your oven's reliable, 12 minutes is plenty.

Now go get your chocolate on.

Molten Chocolate Cakes
Ingredients:

1/4 pound butter, plus enough to grease the ramekins
2 tablespoons flour, plus enough to flour the ramekins
6 ounces semisweet chocolate, chopped
2 tablespoons heavy cream
2 tablespoons confectioner's sugar
2 large eggs
2 large egg yolks
1/4 cup sugar
1 teaspoon vanilla extract
1/4 teaspoon almond extract
1/8 teaspoon cinnamon
Pinch of salt

Heavy cream for whipped cream. Or purchase a superb ice cream to top things off. Jeni's Salty Caramel or Queen City Cayenne come to mind.
Berries: strawberries or raspberries are great

Preheat oven to 350 F.
Grease and flour 4 six ounce ramekins or baking dishes.

In a double boiler, add the chocolate, butter, cream and powdered sugar, and let sit until melted.

In a medium bowl, whisk together the eggs, egg yolks, sugar, vanilla, almond extract, cinnamon and salt for about 3 minutes.
Sift the 2 tablespoons flour into the mixture and fold in. Fold the chocolate into the egg mixture and divide among the ramekins.

Bake at 350 F for about 10 to 12 minutes or until the tops are puffy and the sides are set.

Let cool for about 2 minutes and unmold onto dessert plates. Garnish and eat it while it's warmmmmmmmm.


Suggested soundtrack: Beethoven's Fifth Symphony. Any rendition will do, but listen all the way through, as that final movement is killer.

Friday, December 9, 2011

Fall in Love with Artichokes. [Michael]


When Rhonda and I first started dating, we went to Dorian’s Red Hand,
a restaurant on Second Avenue in New York. On the menu were artichokes served with hollandaise sauce. I told Rhonda that my Mom use to make them all the time for us when they were in season.

Up until then, Rhonda had never had an artichoke. Since I don’t like sharing, we ordered two. As the leaves dwindled down to the core, I took a spoon and scooped out the fibrous hair from the heart and ate my favorite part the artichoke bottom. Rhonda gave me hers as well and that’s when I knew that I was definitely in love.

Nick visited us this past Thanksgiving and I asked him if he wanted to learn his grandmother’s recipe for stuffed artichokes. We had four. Since the artichoke leaves have sharp thorns, trim the thorn off the top of each leaf. Next, cut the stem from the bottom of each one. Mix bread crumbs, salt, pepper, crushed garlic and diced peppered salami together in a mixing bowl. Open the artichoke so that each leaf is exposed. Spoon breadcrumbs into each leaf. Pour just a little olive oil on the top and place the artichokes in a pot. Add enough water to come up to the middle of the four chokes. Cover the pot and steam until tender. Salt can be added to the water. When are they done? When you can pull a leaf from one of the artichokes, and it comes off easily.

How to eat them? There’s no easy way.
Leaves are removed one at a time and the soft breadcrumb is scraped off each leaf using your teeth. Just make sure that there’s an empty dish on the table for everyone to put their discarded leaves. I’ve had artichoke leaves dipped in hollandaise, and in just melted butter. I’ve included a photo of a dipping sauce of oil, vinegar and a chopped boiled egg, served this way at Laurent, a famous restaurant in NYC.


Ingredients:
1 cup of breadcrumbs
6 garlic cloves
6 slices of peppered salami (or, pepperoni, or cooked sausage)
Salt & pepper to taste
3 tablespoons of Parmesan cheese

Wednesday, December 7, 2011

Flounder with Pineapple Salsa [Tom]


Two servings ~ Easy to prepare ~ Ready in 20 minutes

You will need for the flounder and coating:

2 - Flounder fillets
4 - tbspns Wondra flour
1/8 - tpsns Cumin
1/8 - tspns Chili powder
1/8 - tspns Dried Oregano
2 - tbpsns Vegtable oil

You will need for the salsa:

1/4 - Cup Pineapple chunks canned or fresh
1 - tbspns Diced red onion
1/8 - Cup Diced green peppers
2 - tspns Fresh chopped cilantro
1 - tbspns Lime juice
1/2 - tspns Diced or minced jalapeno or other hot pepper
Dash - Salt and Pepper
2 - sliced scallions

Mix all the salsa ingredients in a small bowl except for the scallions and refrigerate.
Save the scallions to dress the dish at the end.

Heat the 2 tbspns of oil in a frying pan over medium heat.
Place and mix all the dry coating ingredients on a plate.
Coat both sides of the fillets and fry turning the fillets only once after 2 minutes. Cook 2 minutes on each side or until golden.

We served the fillets over yellow rice with peas. Add the salsa either on top or on the side.

Sunday, December 4, 2011

Bang Bang Shrimp "Better than sex!" blurts Justin. [Rhonda]


Degree of difficulty: easy
Time: 20 minutes
Serves: 6 to 10 as an appetizer

"Oh man," groans Justin, a tall, sandy-haired twenty-six-year-old, as he grabs a third Bang Bang Shrimp from the tray. "This is better than sex."

Conversation peters away as others crowd around, quickly skewering a shrimp, then another.

Party time in New Jersey last year with Zack's friends and work associates. Having made Bang Bang Shrimp as a quick appetizer, Zack was walking the tray through the packed room. (Don't worry, Justin is not the dude's real name. Wouldn't want to cause trouble with the girlfriend...)

But Bang Bang hasn't been an attention-getter in New Jersey alone. It's made its mark throughout Ohio, and in Tennessee, South Carolina, New York, and many points in between as people have asked for the recipe. Yeah, this might need to be filed in the Life-Changing section of the blog.

So where'd this crazy thing come from anyway? Several years back I had the Bonefish Grill restaurant version of Bang Bang Shrimp during a girls' night out. Not even looking for anything revolutionary, just something decent to eat. But it was wonderful.

In trying to replicate it, I combined my little bit of foodie knowledge with online suggestions to get this basic iteration. And you can add in the stuff you like: some jalapenos, extra lime, maybe a sprinkle of cilantro. But the basic notes should remain: heat (go big or go home!), a touch of sweet, the salty undercurrent of soy, the light creaminess of mayo and the crunch of the crispy-fried shrimp.

Now, as fab as this sauce is, don't--don't!--get all excited and pour the whole bowl of sauce over the shrimp. Start with a little and go easy. Too much makes it gloppy and heavy.

Not that Justin would have a problem with that.

Bang Bang Shrimp
Ingredients:

1 lb. uncooked shrimp, tails and shells removed, de-veined
1 beer
1/2 to 1 cup corn starch
Canola oil for frying


Soak shrimp for 10 minutes or so in beer.
Roll in corn starch, saute in canola oil until crispy, drain on paper towels.


Sauce
1/2 cup mayonnaise (I use Kewpie mayo from Japanese market, can do with regular)
Sriracha to taste (approx 1 to 2 T)
Sweet chili sauce to taste (approx 1T)
1 T soy sauce


Sprinkle finished dish with:
Red pepper flakes
1 to 2 scallions, minced
Black sesame seeds (optional)
Lime wedges (optional)

The sauce is done to taste--keep mixing until you hit upon the combo that's not too sweet but not too mayo-y. Then just before serving, toss shrimp in sauce, coating evenly.
Serve on platter with shredded lettuce underneath, red pepper flakes, sesame seeds, and minced scallions sprinkled on top. Lime wedges are also good for added flavor.


Suggested soundtrack: Ciara's "Gimmie Dat"

Wednesday, November 30, 2011

Chicken Satay with Peanut Sauce [Zack]

If you’ve ever been to a Thai restaurant, you have most likely had an appetizer called Chicken Satay. It’s about as popular as the ubiquitous Pad Thai (i.e. the General Tso’s Chicken of Thai food). Well, It’s popular because it’s a great crowd-pleaser. The sauce couldn’t be easier to make if you have a food processor. You can knock this appetizer out in less than 20 minutes from start to finish.

The first time I tried to make this was in Manayunk, PA at Lauren’s house. We were feeling adventurous, so we bought some peanut butter, ginger, vinegar, and guessed what else was in it until we got close.  It's near the authentic version, but has a little bit of a twist on it.  We’ve used this sauce on everything from shrimp to steak to whole roasted chickens.

Process:

We will marinate the chicken first.  


Cut the chicken thighs or breasts into long strips about 1 inch wide by 3 inches long.  Put them into a bowl and toss with the vinegar, sesame oil, curry powder, and garlic powder.


Now, move on to your peanut sauce.  


Loosely dice the ginger, garlic, onion and chile (optional) and put them into your food processor.  Process until you have a paste.  Then, add the peanut butter, hoisin sauce, sriracha, and rice wine vinegar.  Take it easy on the sriracha at first, you can always add more later ;)

Process until smooth.


Start your grill or pre-heat a saute pan to medium.  Take your marinated chicken and skewer them.  


Add a bit of oil to the pan and cook for about 3 minutes per side.


Serve on a plate with a generous glop of peanut sauce!


Ingredients:
(makes about 12 skewers or so)

4 chicken breasts or 8 chicken thighs
2 T garlic powder
2 T curry powder
1 T sesame oil
1 T rice wine vinegar
1 1/2 tsp salt
bamboo or metal skewers

1 inch ginger
2 garlic cloves
½ small onion
1 birdseye chile
3 T rice wine vinegar
3 T hoisin sauce
1 cup peanut butter
4 T sriracha sauce (I add this much, but you can back off a bit if you want)

Busta Rhymes - Woo ha

Sunday, November 27, 2011

Home Brewing - Batch 1 - Part 1 [Matt]

Beer has always been a beverage of interest to me. It's delicious, dynamic, and generally better than a glass of water. I always thought brewing my own batch would be as far out of reach as me passing freshman chemistry. I was wrong, and it feels so right.

Jess and I decided to look into home brew equipment about a month ago and we came across a fantastic shop Eagle Rock Home Brew that offered a $10 class and a hub to buy any and all supplies. We took the class last Sunday and were hooked.

We agreed our first batch should be an IPA, but not just any IPA, a crazy-hybrid-ninja-samari-pirate-dwarf type IPA. I've been obsessing with fennel over the past few months and pondered why I've never tasted the flavor note in any of my favorite hoppy brews.

The steps and images below describe what we did with the first run of our IPA. To get more info and read a full 'How To', go to ERHB's instructions.

7:00p - The Clean & Prep
- We started by sanitizing all equipment including our 6 gallon cook pot.
- I took the liquid yeast container out of the fridge and put into my pocket (as instructed - brings yeast to room temp gradually in order to activate it), used - White Labs WLP001 California Ale.
- Place 2.5 gallons of water into the freezer to help chill the wort at the end of the cook.

7:15p - The Cook
STEP 1
- Filled the 6 gallon pot with ~2.5 gallons of water (filtered Brita). Cranked both burners all the way up to get the pot to start heating up.

STEP 2
- Filled a normal sauce pot with a gallon of water (spring) to bring to 150f.
- Grain mix added for steeping: 8oz Carmel 10L / 4oz Carmel 20L / 4oz Carmel 60L


STEP 3
- Kept steeping pot on stove at 150f for 10 min, then took pot off stove and covered for 20 min.
- Strained out the grain when pouring the steeped liquid into the main cook pot.

STEP 4
- Mixed in 9lbs of Alexander's Pale Malt Extract (looks like carmel sauce, about the same consistency).


8:45p - The Boil
During the class I asked the instructor why Dogfish IPA had 'minute' batches and what that meant. He explained that their technique involved gradually adding in hops throughout the stated amount of time. This process ensures the flavor of the beer will be well-rounded and makes it more hoppy. I decided to diverge from the recipe I was somewhat following and go for an 85 minute total boil time.

STEP 5
- Started adding in the Columbus 14.0% hop pellets, a few per minute, over the next 25 minutes, 1.5oz total.


9:10p - STEP 6
- Started adding in the Cascade hops, a few per minute over 25 minutes, 1.0oz total.

STEP 7
- Started adding in another set of the Columbus hops, a few per minute over 25 minutes, 1.0oz total.


10:00p - Spicing the boil
STEP 8

This is the part of brewing your wort when you add in any additional spices, if that's your thing. If there's a spice of interest that you want to throw into a brew, do research, it is pretty easy to find some reference for what does and doesn't work.

- Added 1.5oz Fennel Seed (the whole container)

10:10p - Cool it. Store it.
STEP 9
Now that the wort has boiled, it is time to cool it down in a hurry. If you have a sink that can fit a 6 gallon pot (psssh luucky), partially submerge it in there. If not, use your bath tub. It's not gross if you're not gross.
- Keep the pot in cold water for 30 minutes. Quickly cooling the wort helps with the beer's clarity.

STEP 10
- Now transfer the wort from the cook pot, through a strainer, to the 5 gallon bucket.
- Add in the cooled water that you have been storing in the freezer to bring the water level to the 5 gallon mark on the side of the bucket. The wort should be between 60 - 70f for some prime-time fermenting to happen.
- Take the vile of yeast that has been hangin out in your pocket, give it a light shake. Dump it into the 6 gallon carboy.

STEP 11
- Use the autosyphon to transfer the wort from the bucket to the 6 gallon carboy. Make sure not to get the last inch of liquid from the bucket. It will cloud your beer and your success.

STEP 12
- Fill the Fermentation Air Lock and Stopper with the cleaning liquid and insert into the top of the carboy.
- Put it in a space that holds an even temperature and doesn't receive any light.


10:50p - Let 'er be.
The beer will begin to ferment over the next 3 to 5 days. Leave it in there up to a week, then transfer to the secondary fermentor. The beer will sit there for another 1 to 2 weeks.
Check back in soon when I bottle and label our fresh brewed IPA!

24 Hours Later
All is well with the brew and it's fermentation. Checkout the bubbles! That means it's working...


((((cook track)))) Trivium - Dusk Dismantled